Post by BrutalAce on Aug 14, 2017 4:38:00 GMT
TUTORIAL: How to create a physics asset ?
I have been writing this tutorial from some days however after working on two different PhysicsAsset files I am not sure how much helpful it will be because from my experience working on physics is purely case per case experience, I thought that my experience with Laura’s physics will help me in Mika’s physics but it didn’t, I ended up having more bad attempts with Mika than Laura, particularly because of her hairs. In the end I made them pretty decent but it’s mostly a matter of try and fix then try again.
With that being said, this tutorial will help you understand the basic setup of PhysicsAsset file and how different parameters control different aspects of physics calculation. Again I cannot explain why I used a particular value (say 250) in a particular field because that purely depends on the results you want, however I can give you general description of that field.
REQUIREMENTS
1. Unreal Engine 4.6.7
2. General knowledge of SFV file structure and modding.
3. FBX file of the character you want to edit.
4. General knowledge of physics.
STEP 1
Create a new Unreal Project with basic folder structure of SFV for the character you want to mod then import the FBX file in the mesh folder as shown.
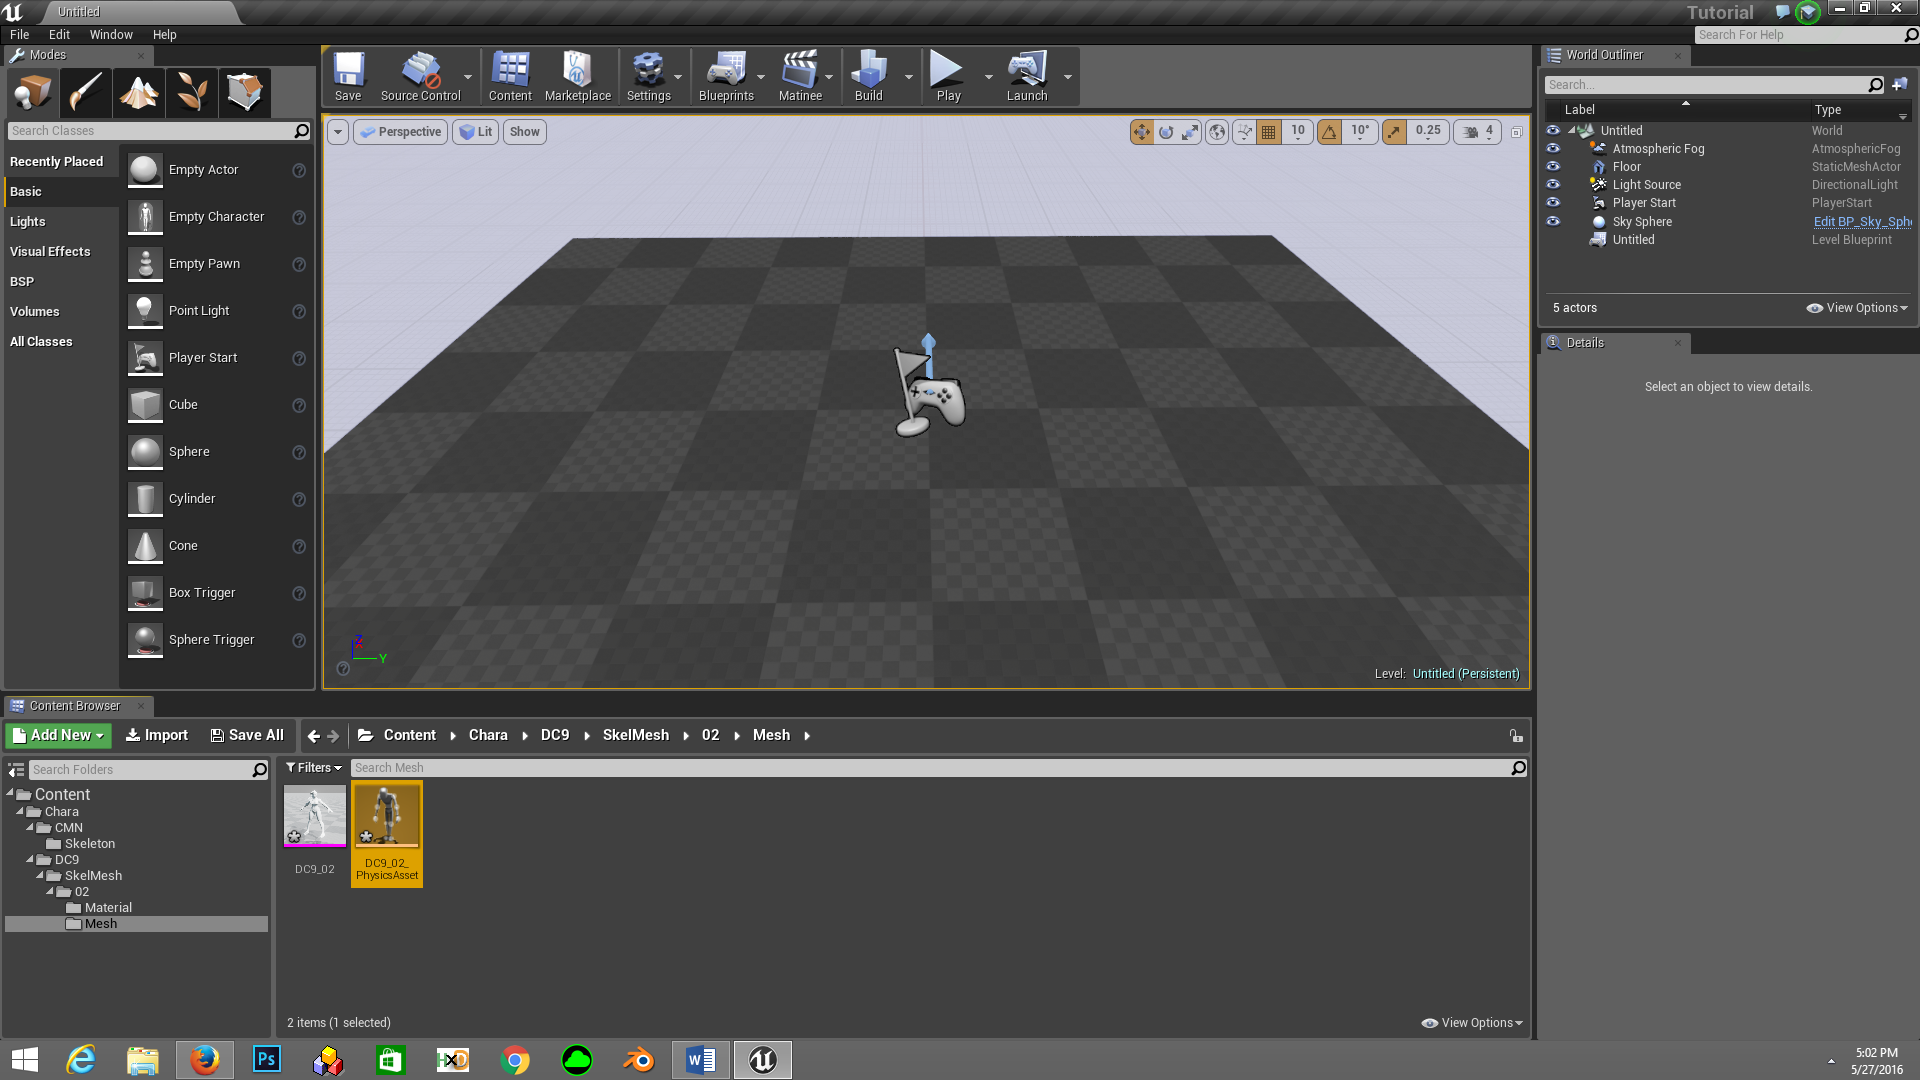
This will give you all the materials, character model, skeleton and a PhysicsAsset file. Move every files into their respective folders, basically we don’t need materials and character though we keep them for correct references.
STEP 2
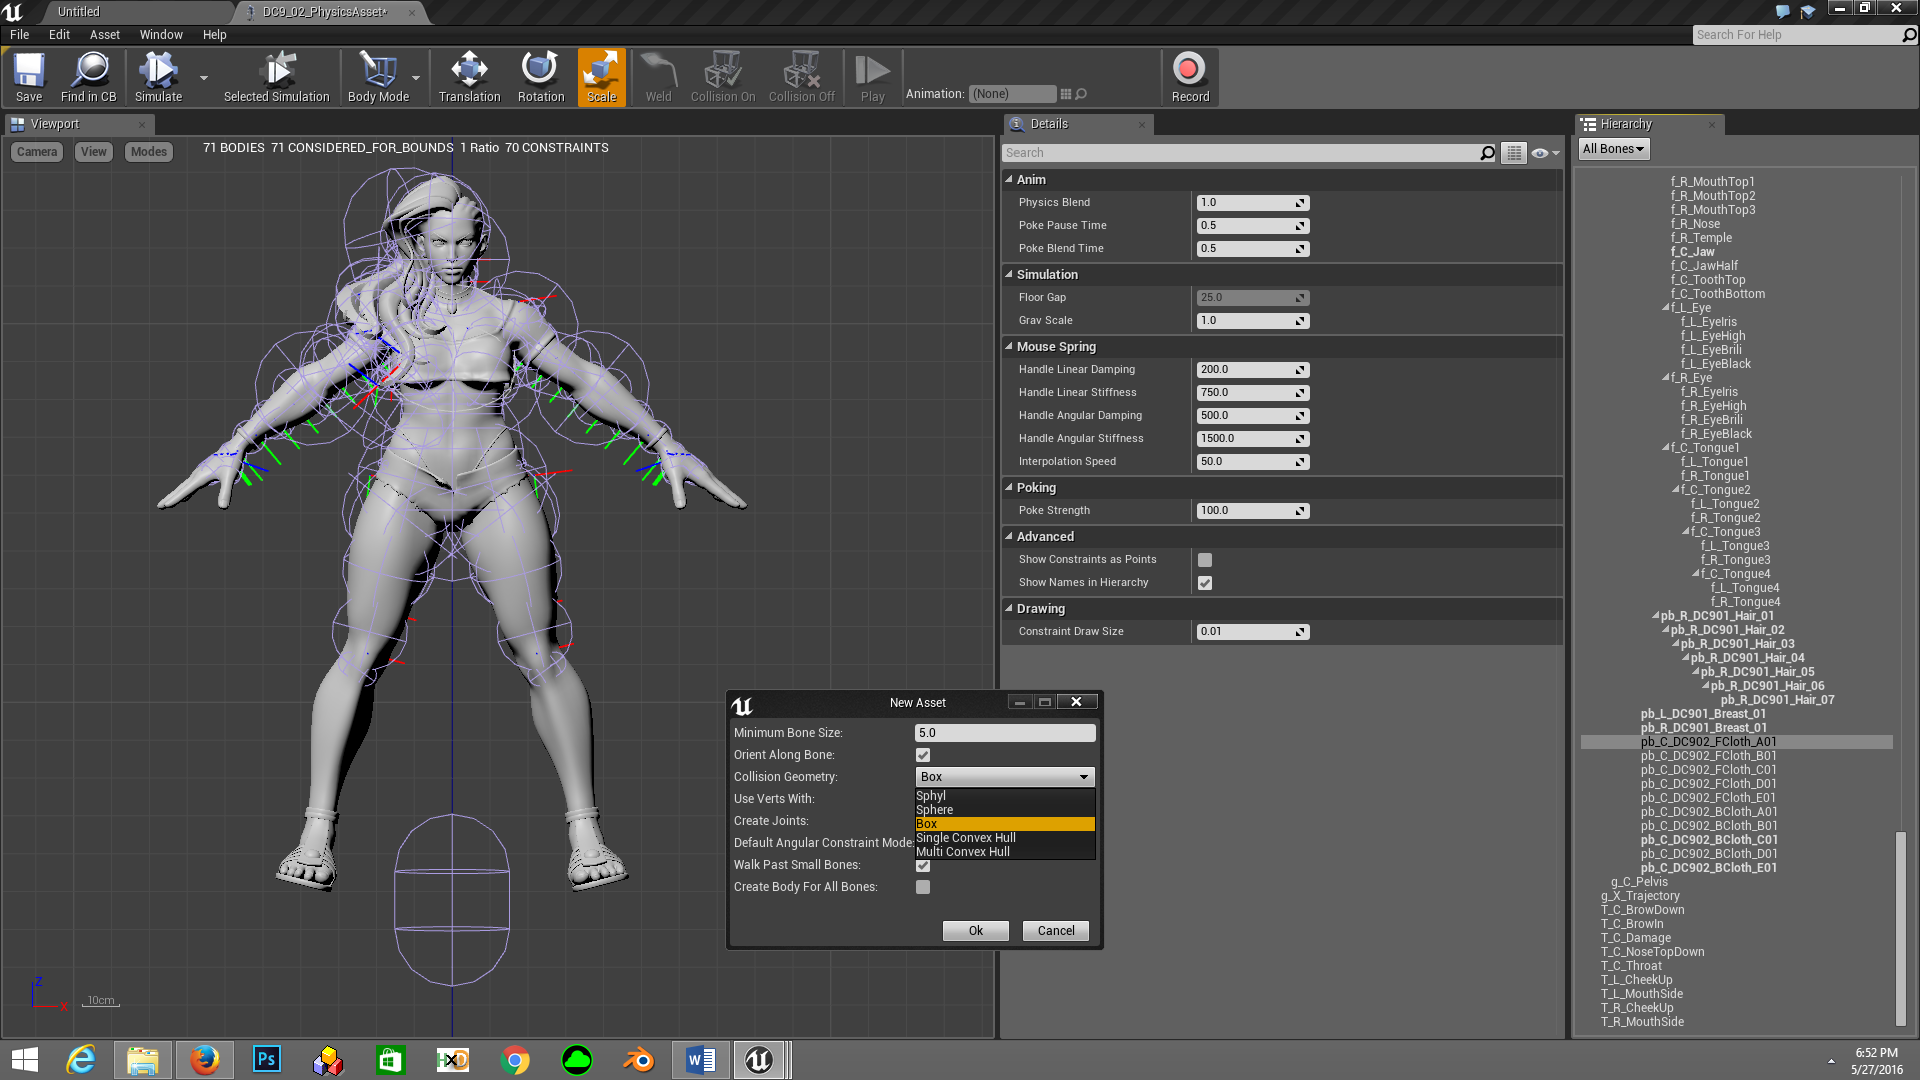
Double click the PhysicsAsset file to open PhAT (Physics Asset Tool). This will give you character’s preview with its bone envelops as shown.
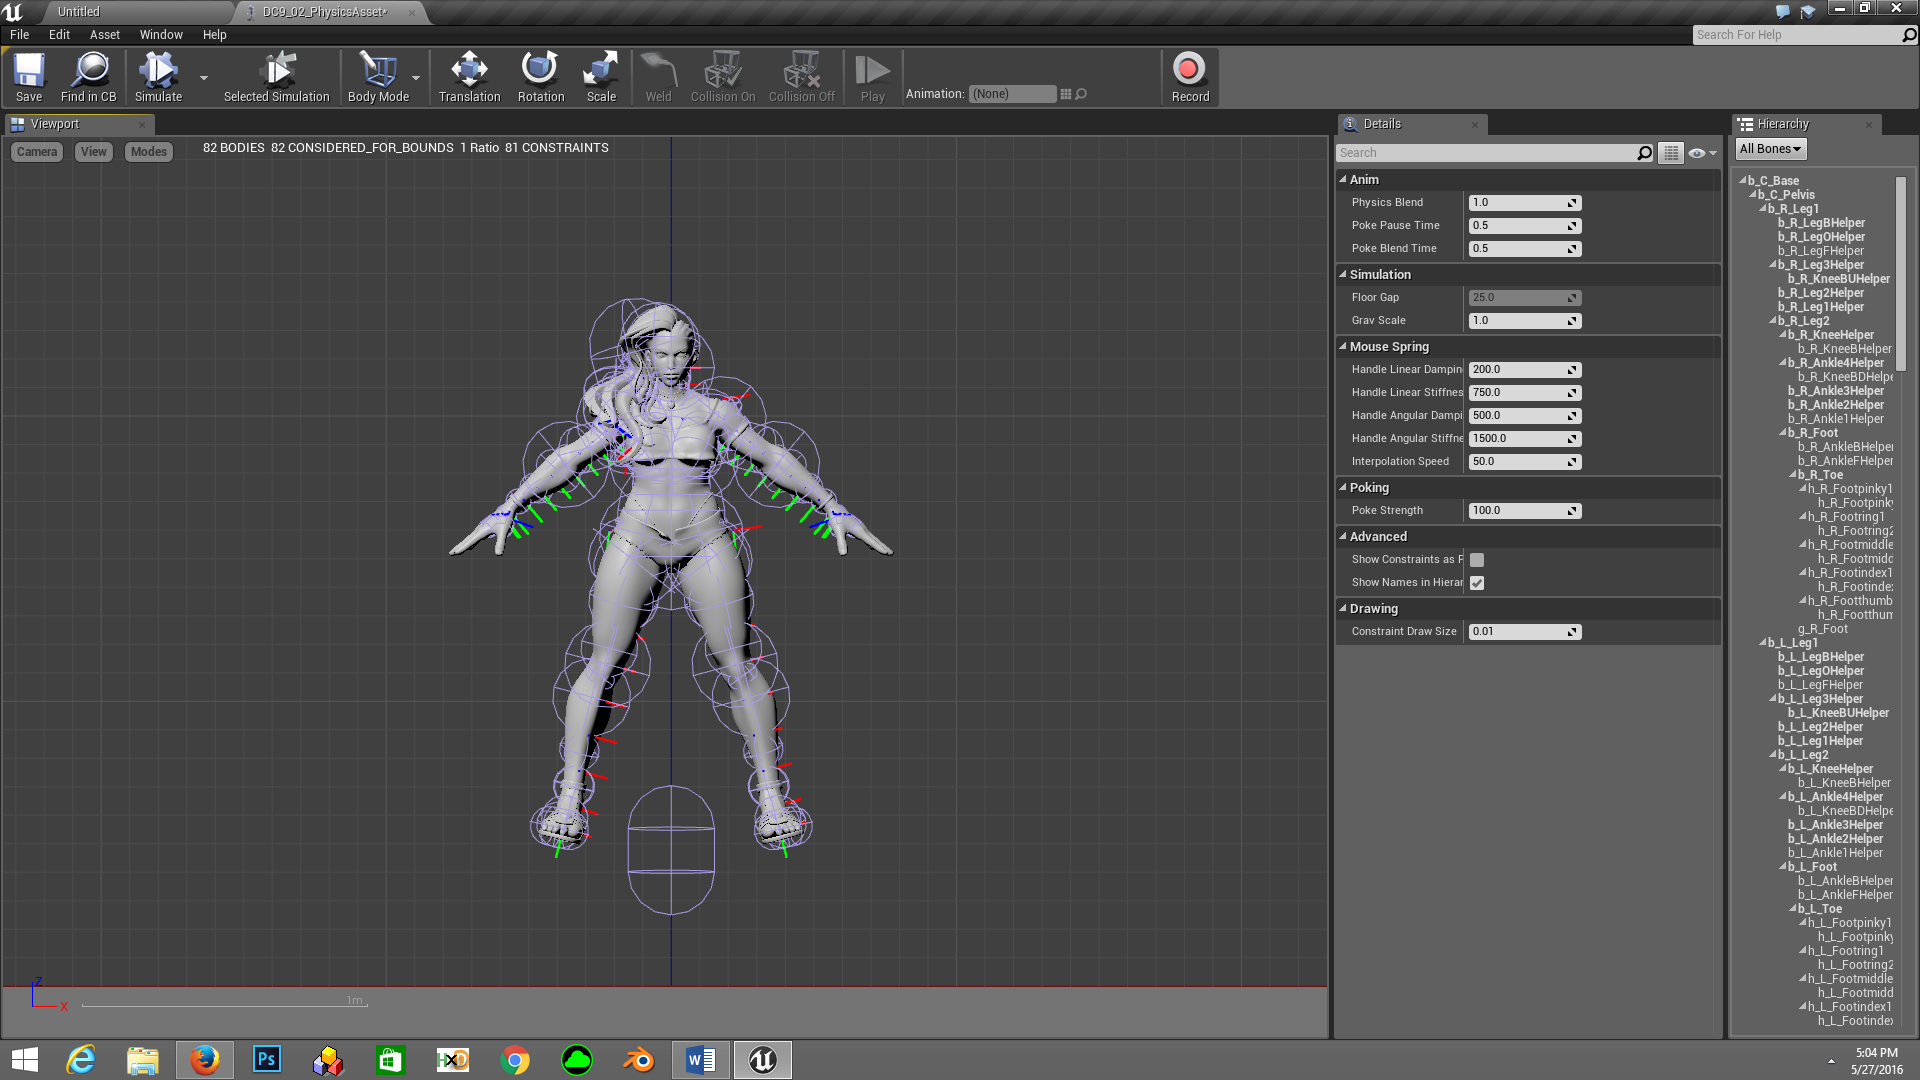
I don’t know how Unreal Engine understand which bone needs collision but I think it make some wrong assumptions so you can go ahead select and delete envelops you don’t need (area that doesn’t require any collision). Leaving envelops as it is don’t have any effect it just increase PhysicsAsset file size.
In this case I don’t think Laura’s story costume require any collision around the leg parts so I deleted some envelops here as shown.
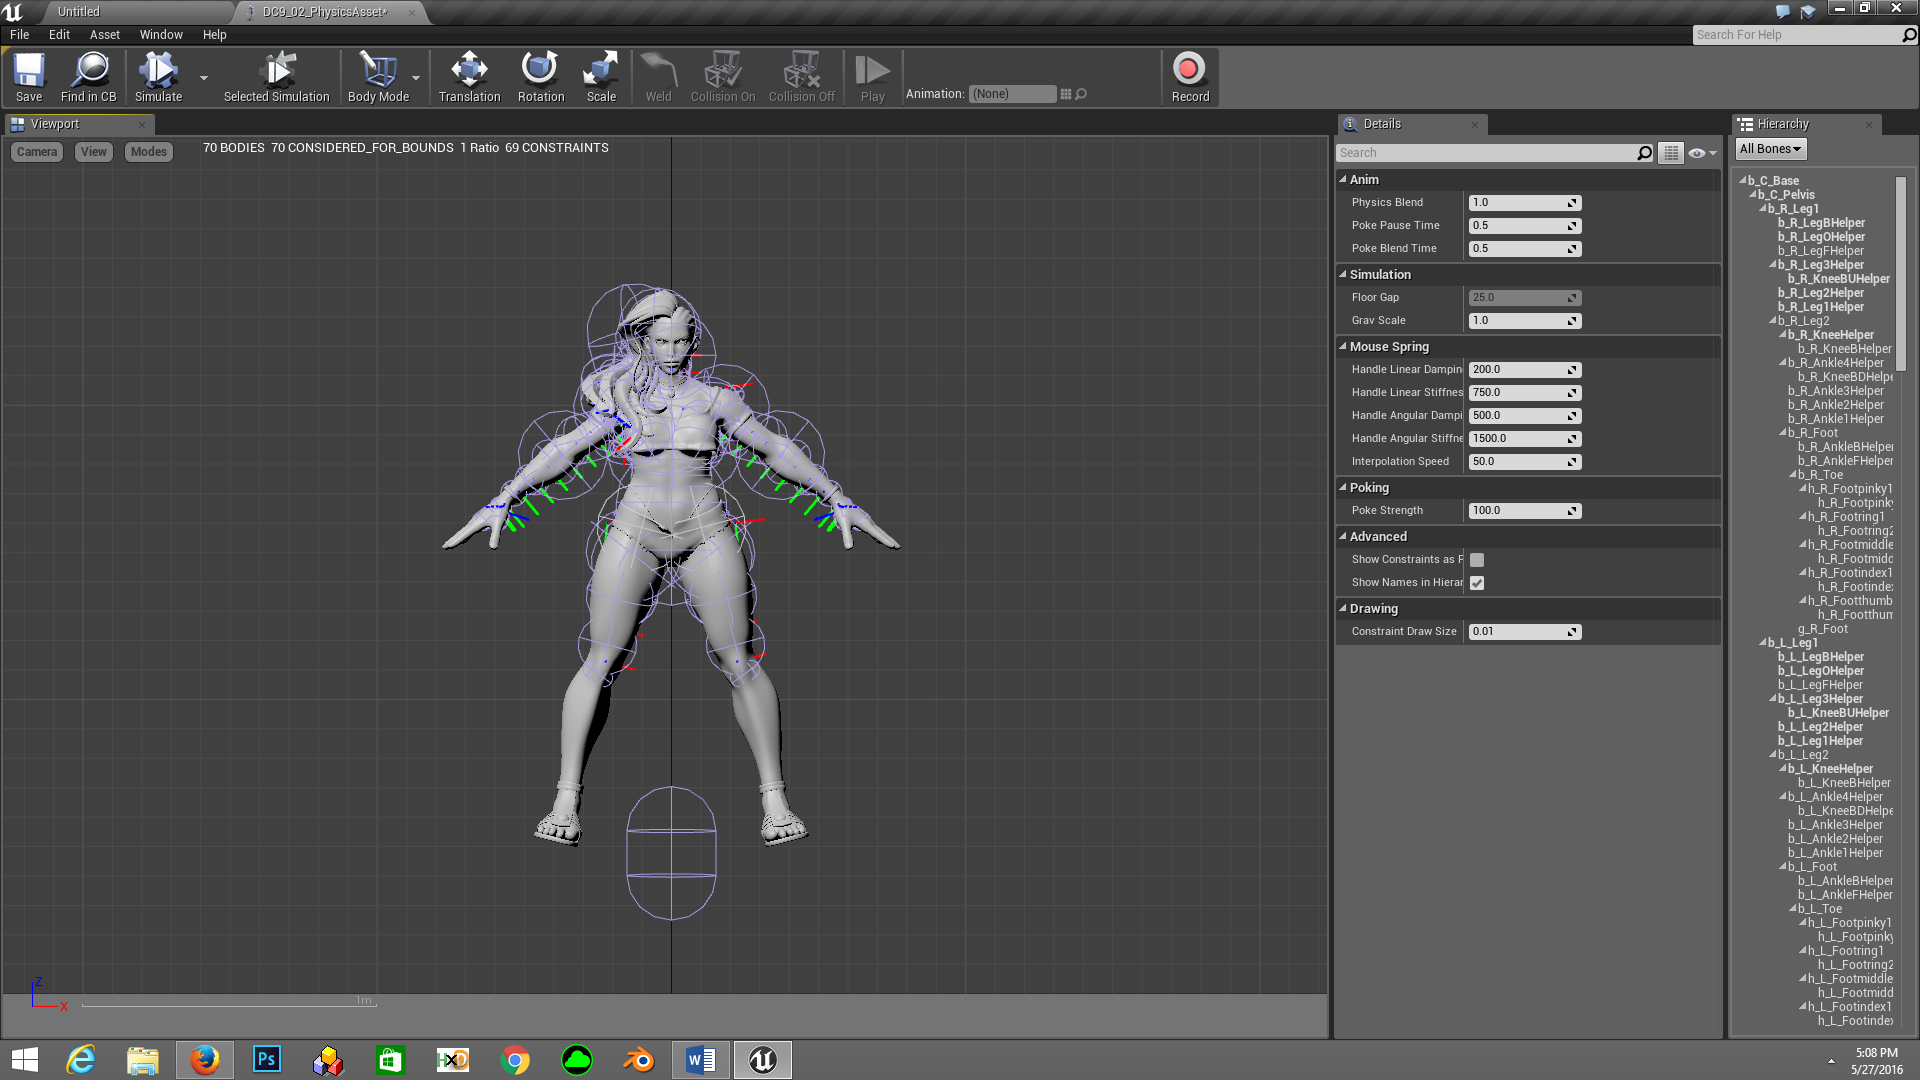
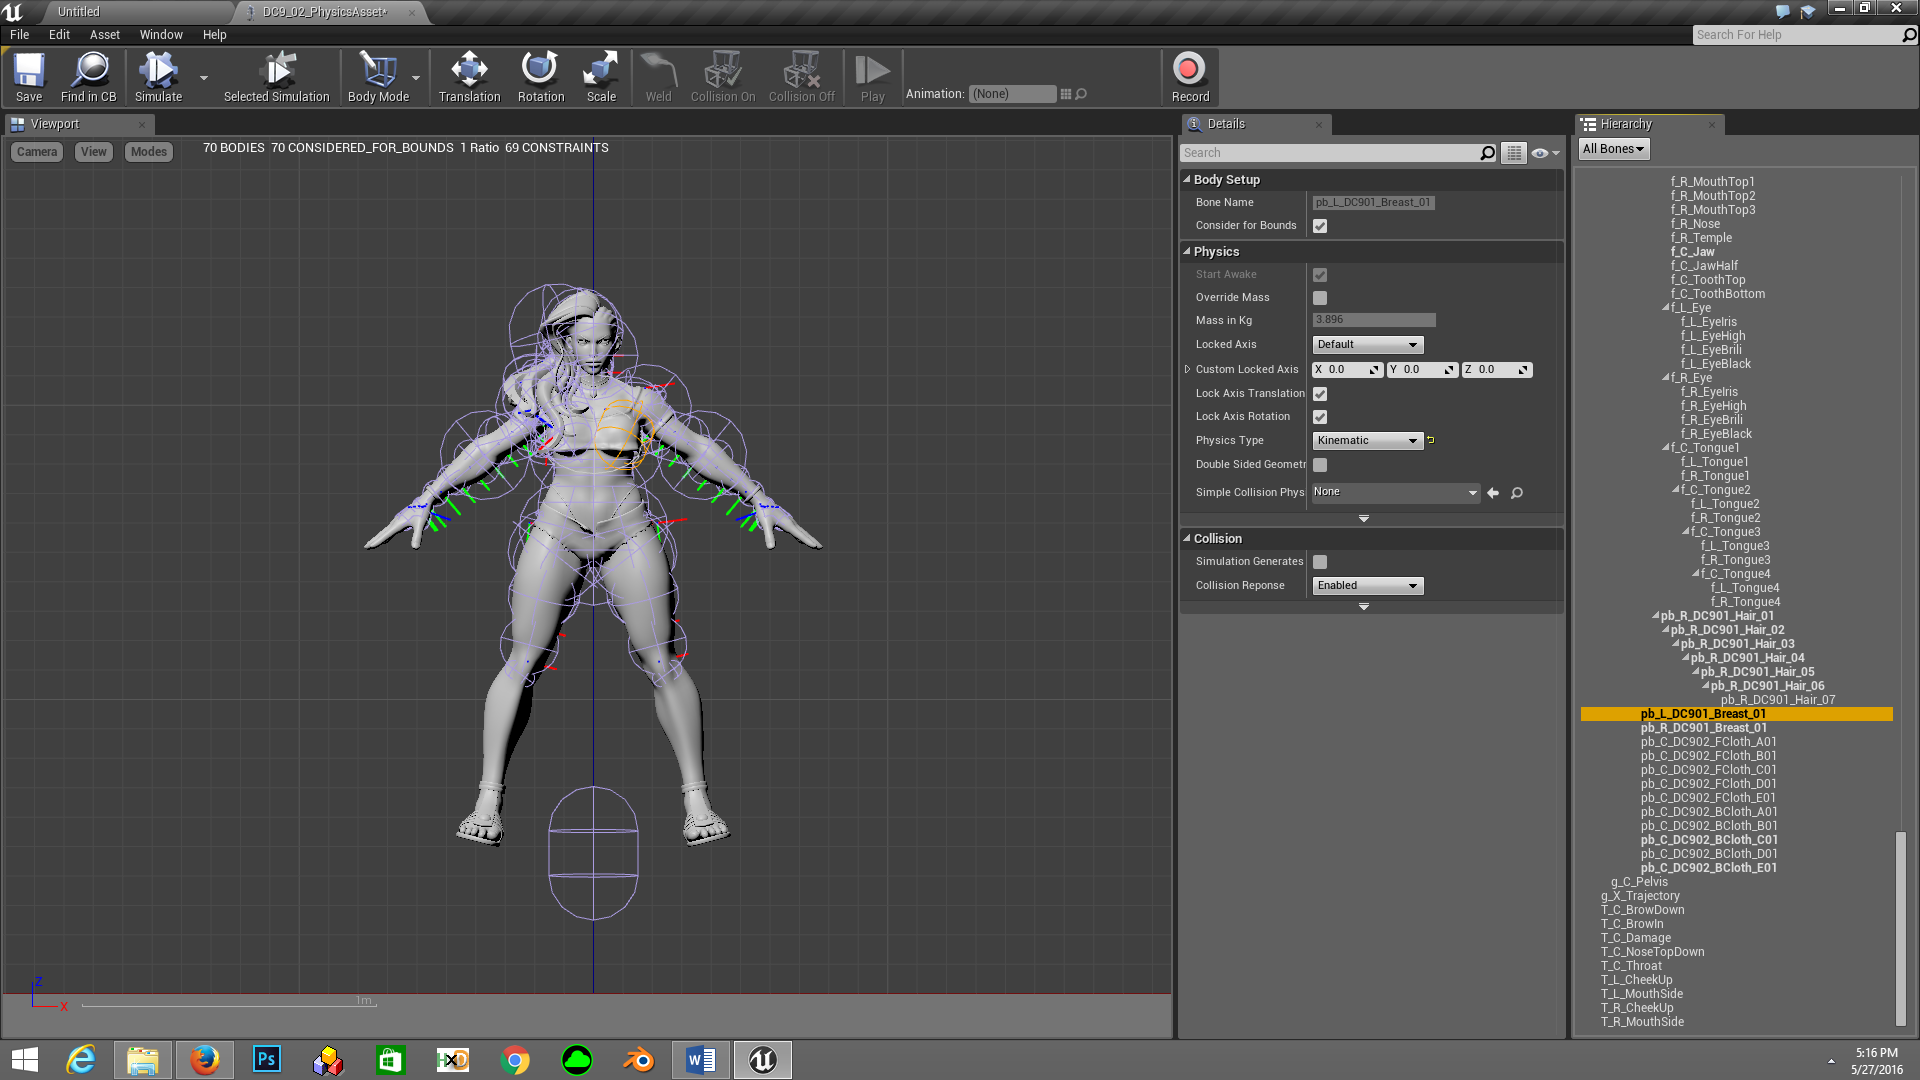
Now select all bones from right list and choose physics type “kinematic” as shown. This will make every bone static having no physics calculation, we will now work on bones that require physics calculation.

STEP 3
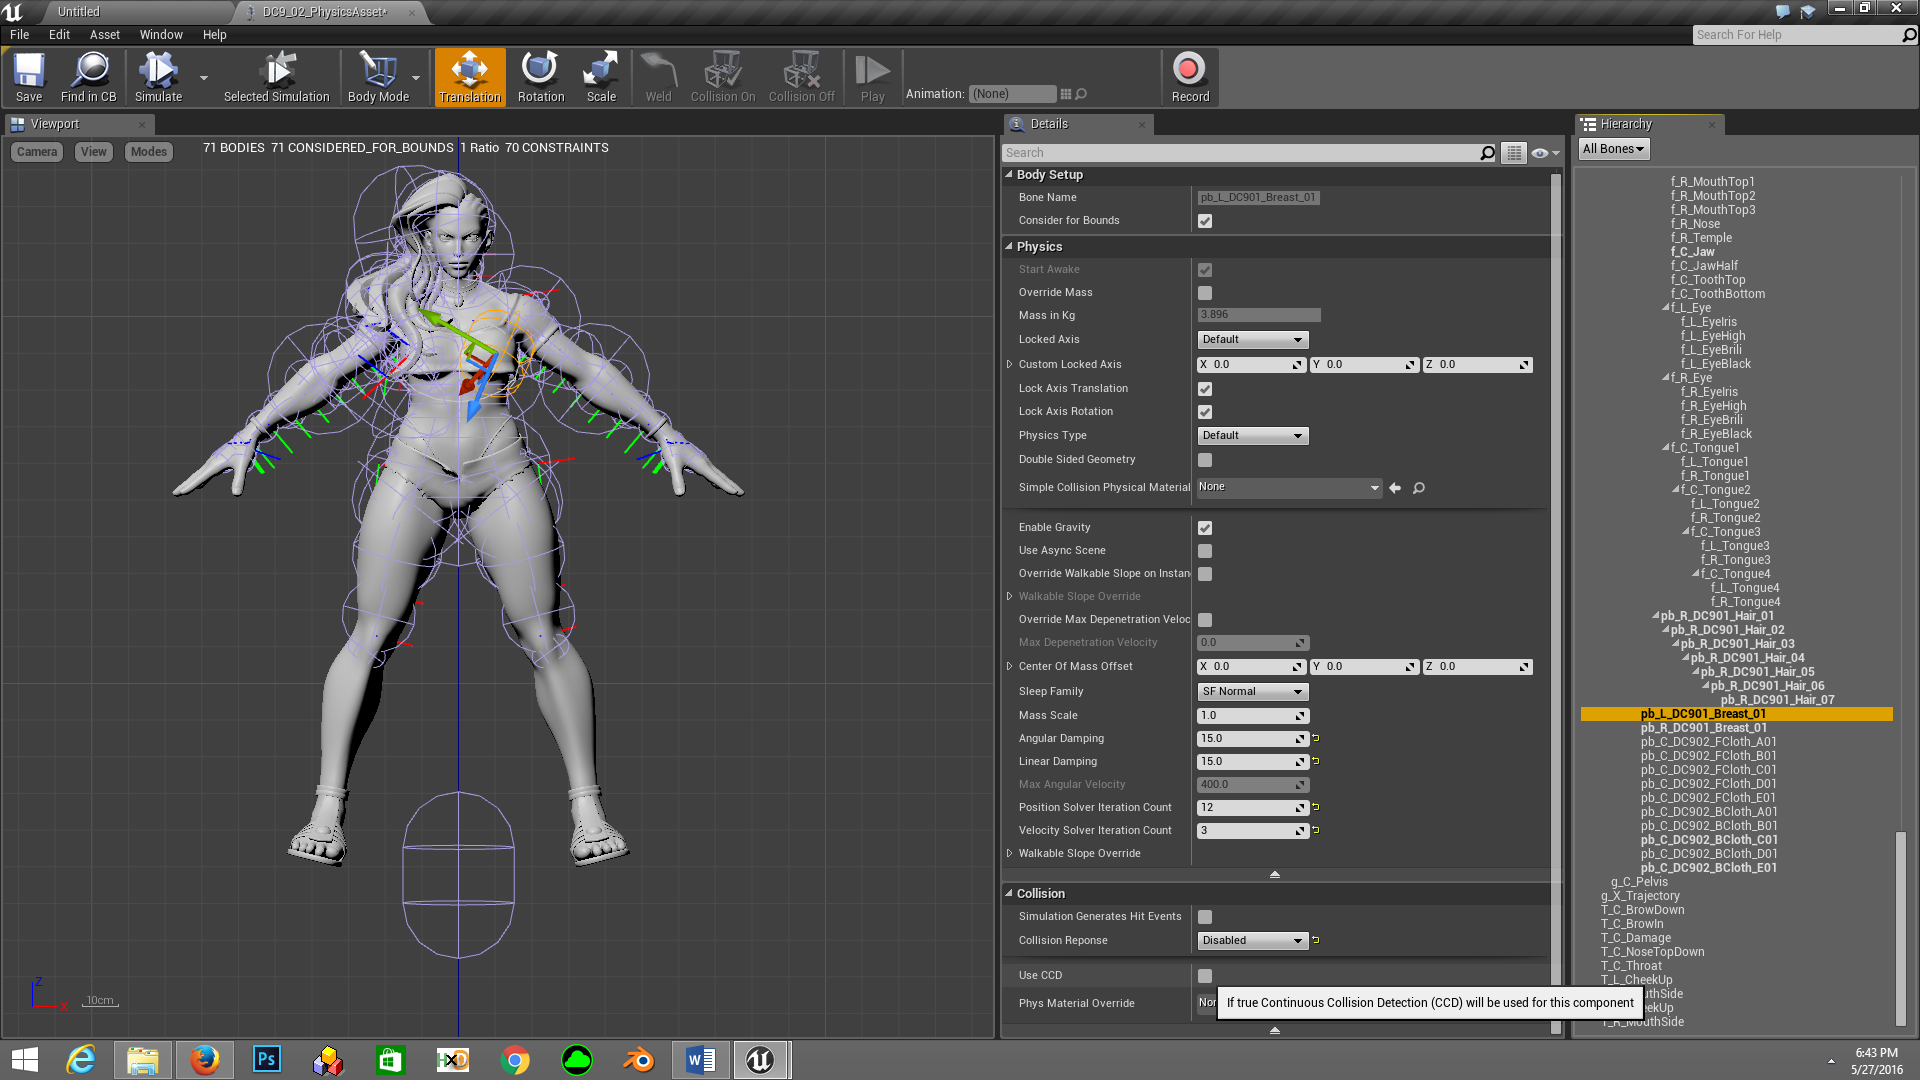
From the list on right select a bone that requires physics. In my case I selected pb_L_DC901_Breast_01 as shown.
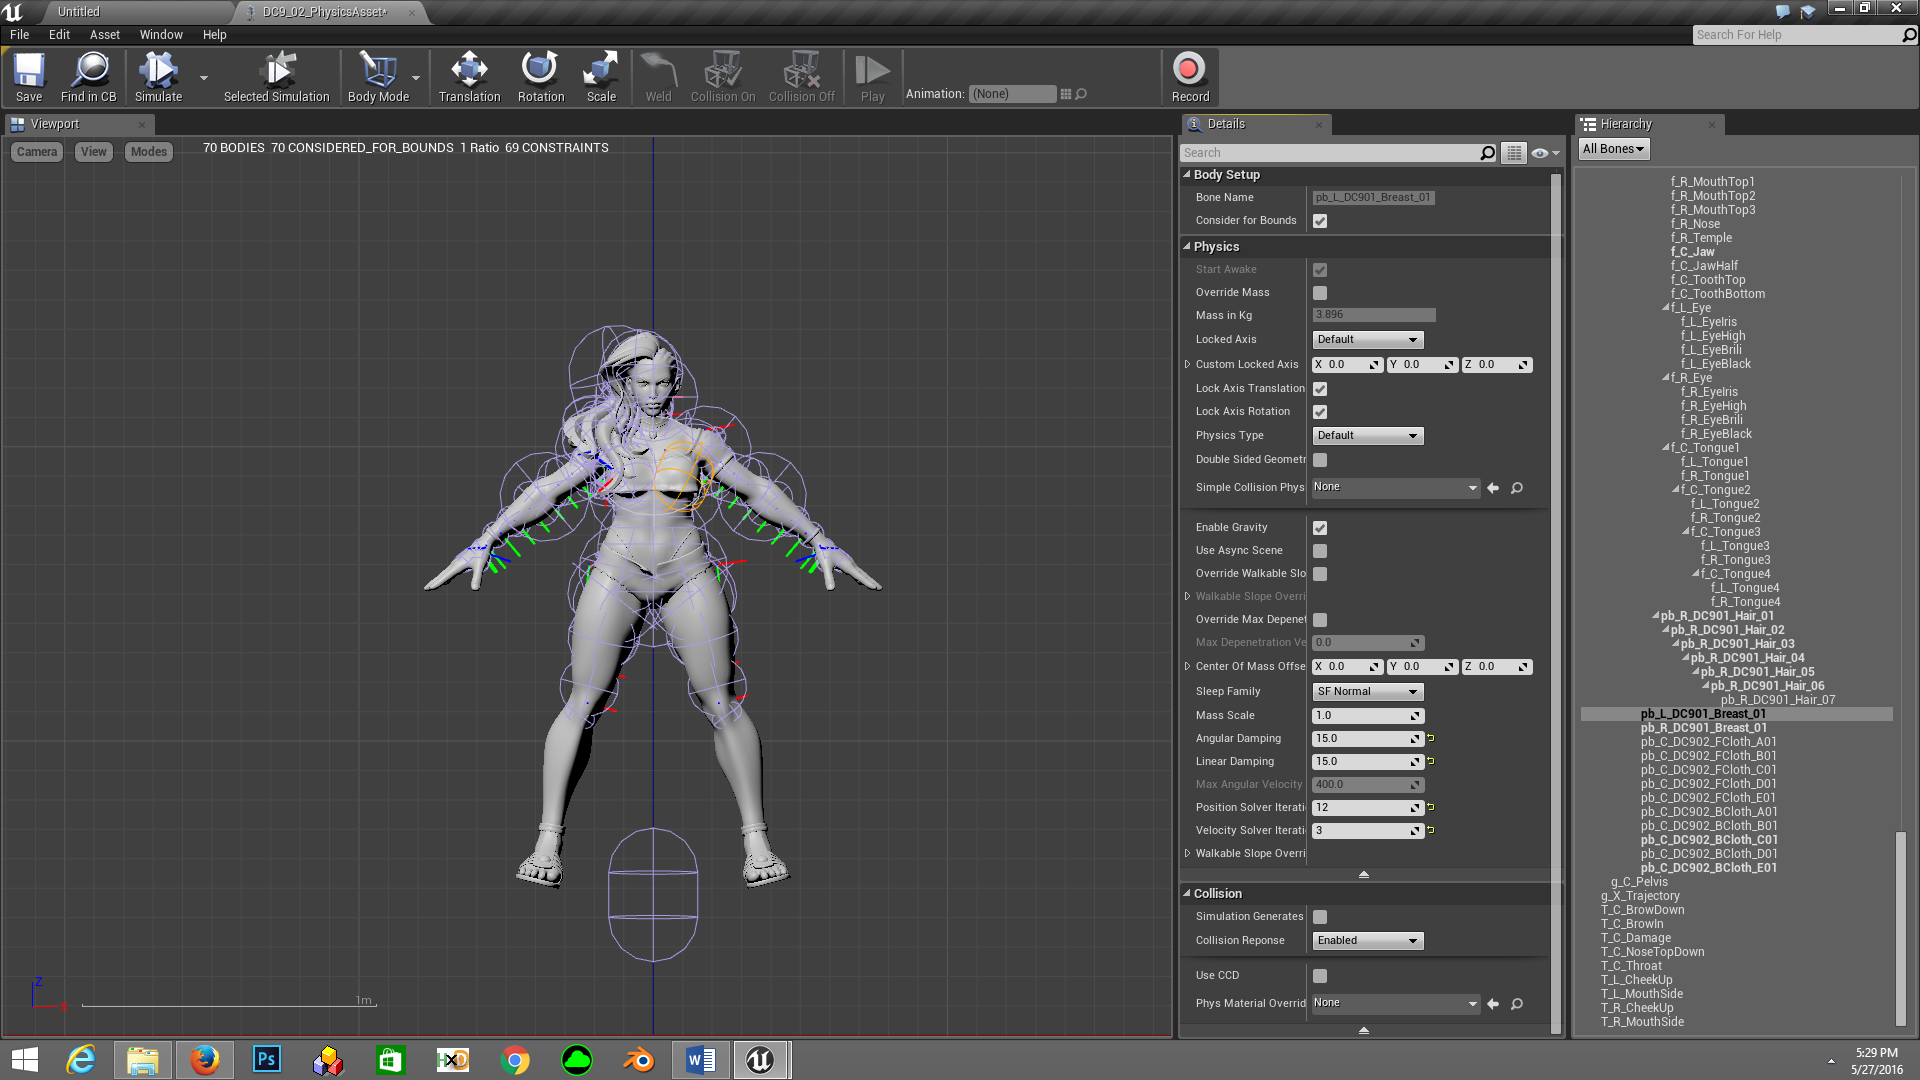
Now from the physics type drop down select “default” then in Physics pane adjust angular and linear damping. These add drag resistance to the movement making it slower and controlled, you might not need both but in my case I entered 15 for both. Experiment to get the results you want.

Position Solver Iteration and Velocity Solver Iteration can be used to increase physics calculation accuracy at the cost of CPU overhead, I found them giving subtle improvement to the physics but since we have good CPUs on PC increasing them is harmless so go ahead but don’t go crazy on them as I said they provide subtle or barely noticeable improvement. In my case I picked values 12 and 3 respectively (defaults are 8 and 1).
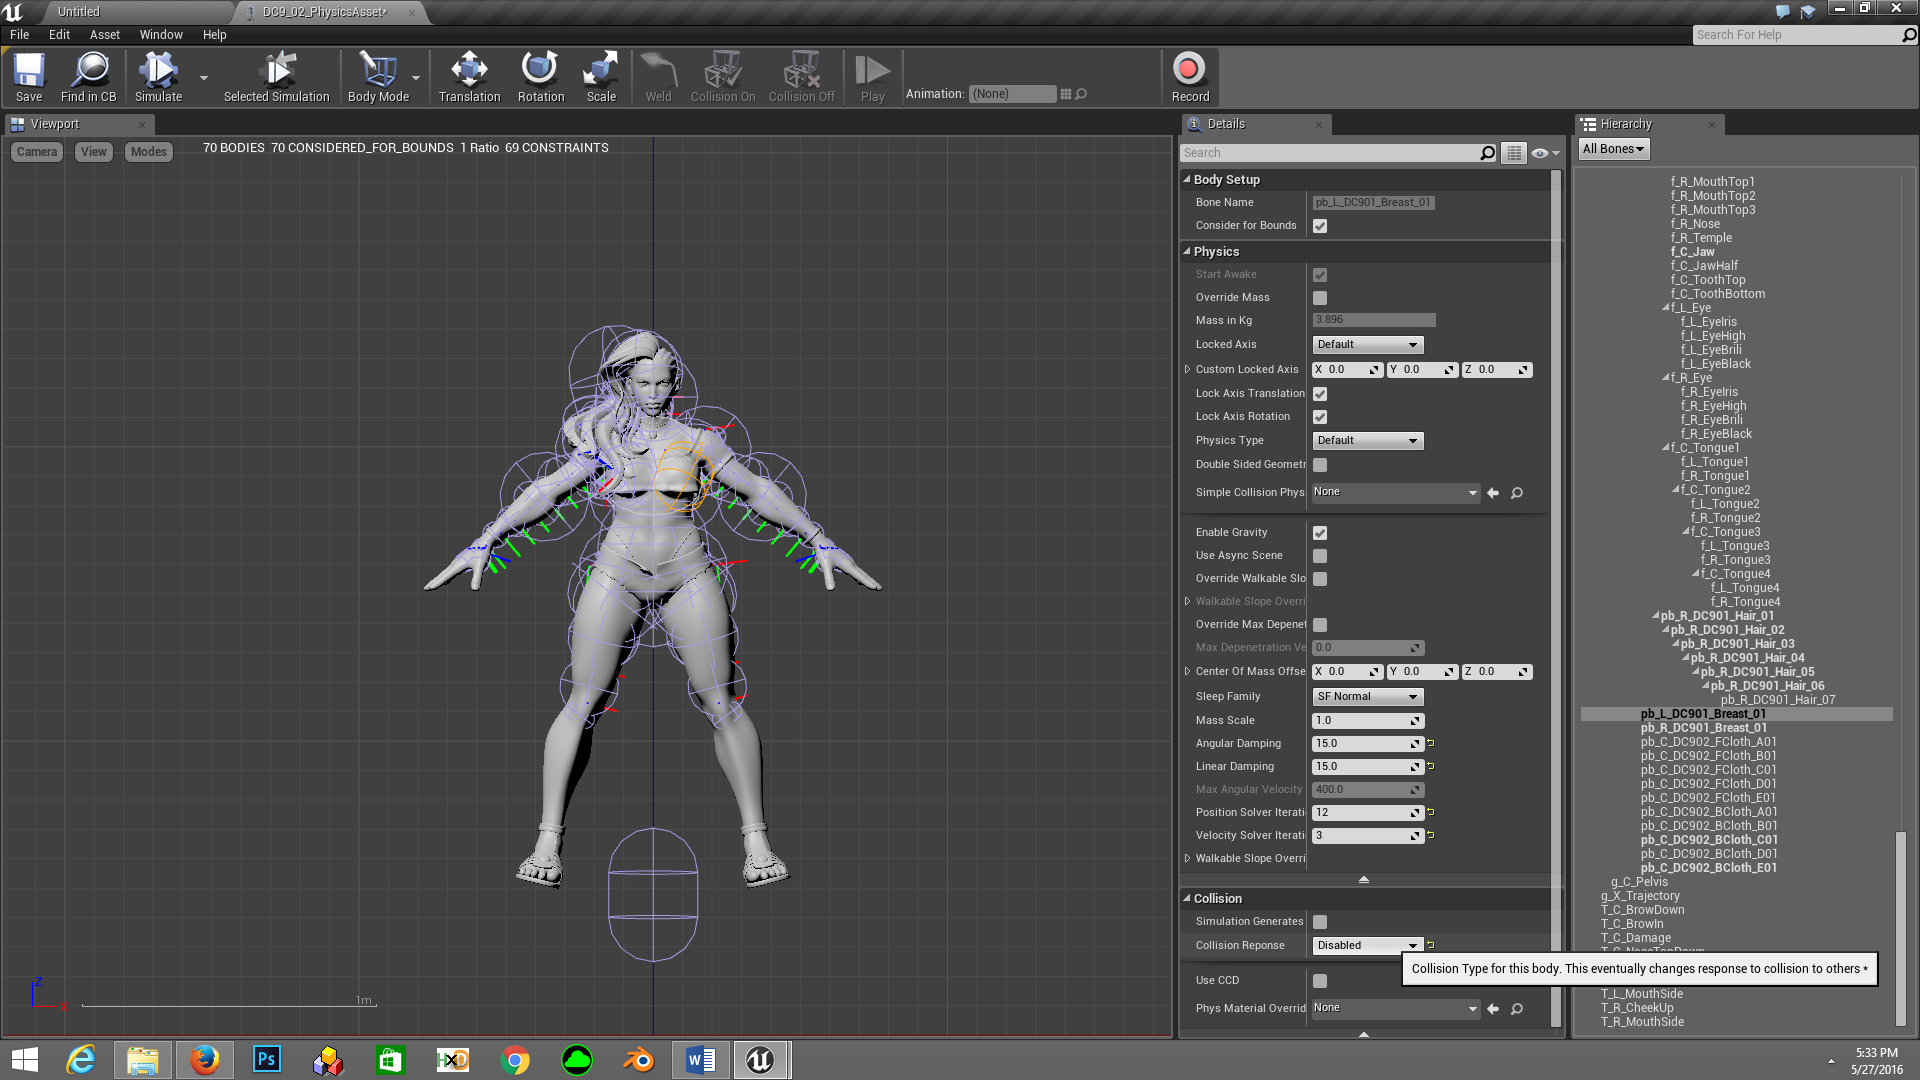
Now set collision response to “Disabled” because for breast bones we don’t need them to collide with anything else. After that select the other breast bone pb_R_DC901_Breast_01 and adjust same properties with same parameters.
STEP 4
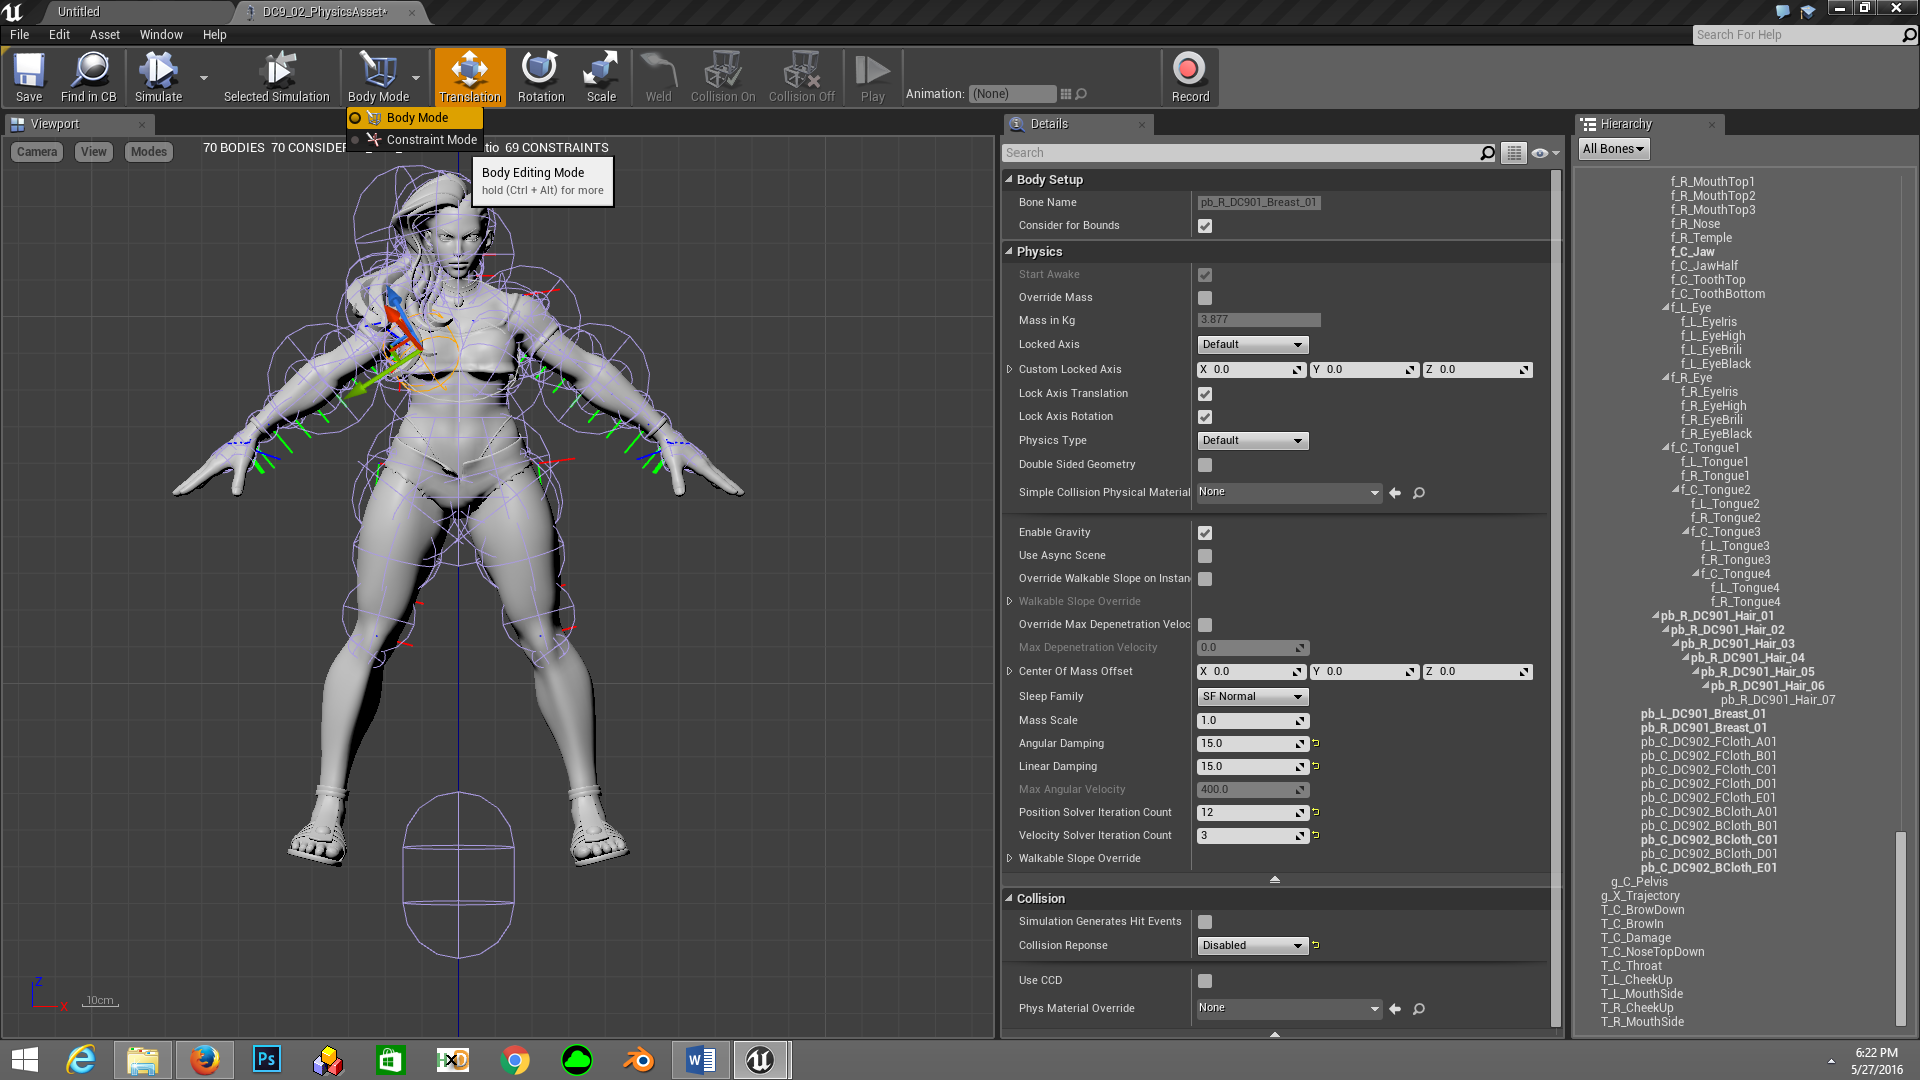
At this point we’re ready to move to the constraint screen, currently we were working in body screen so we will switch to constraint screen as shown.

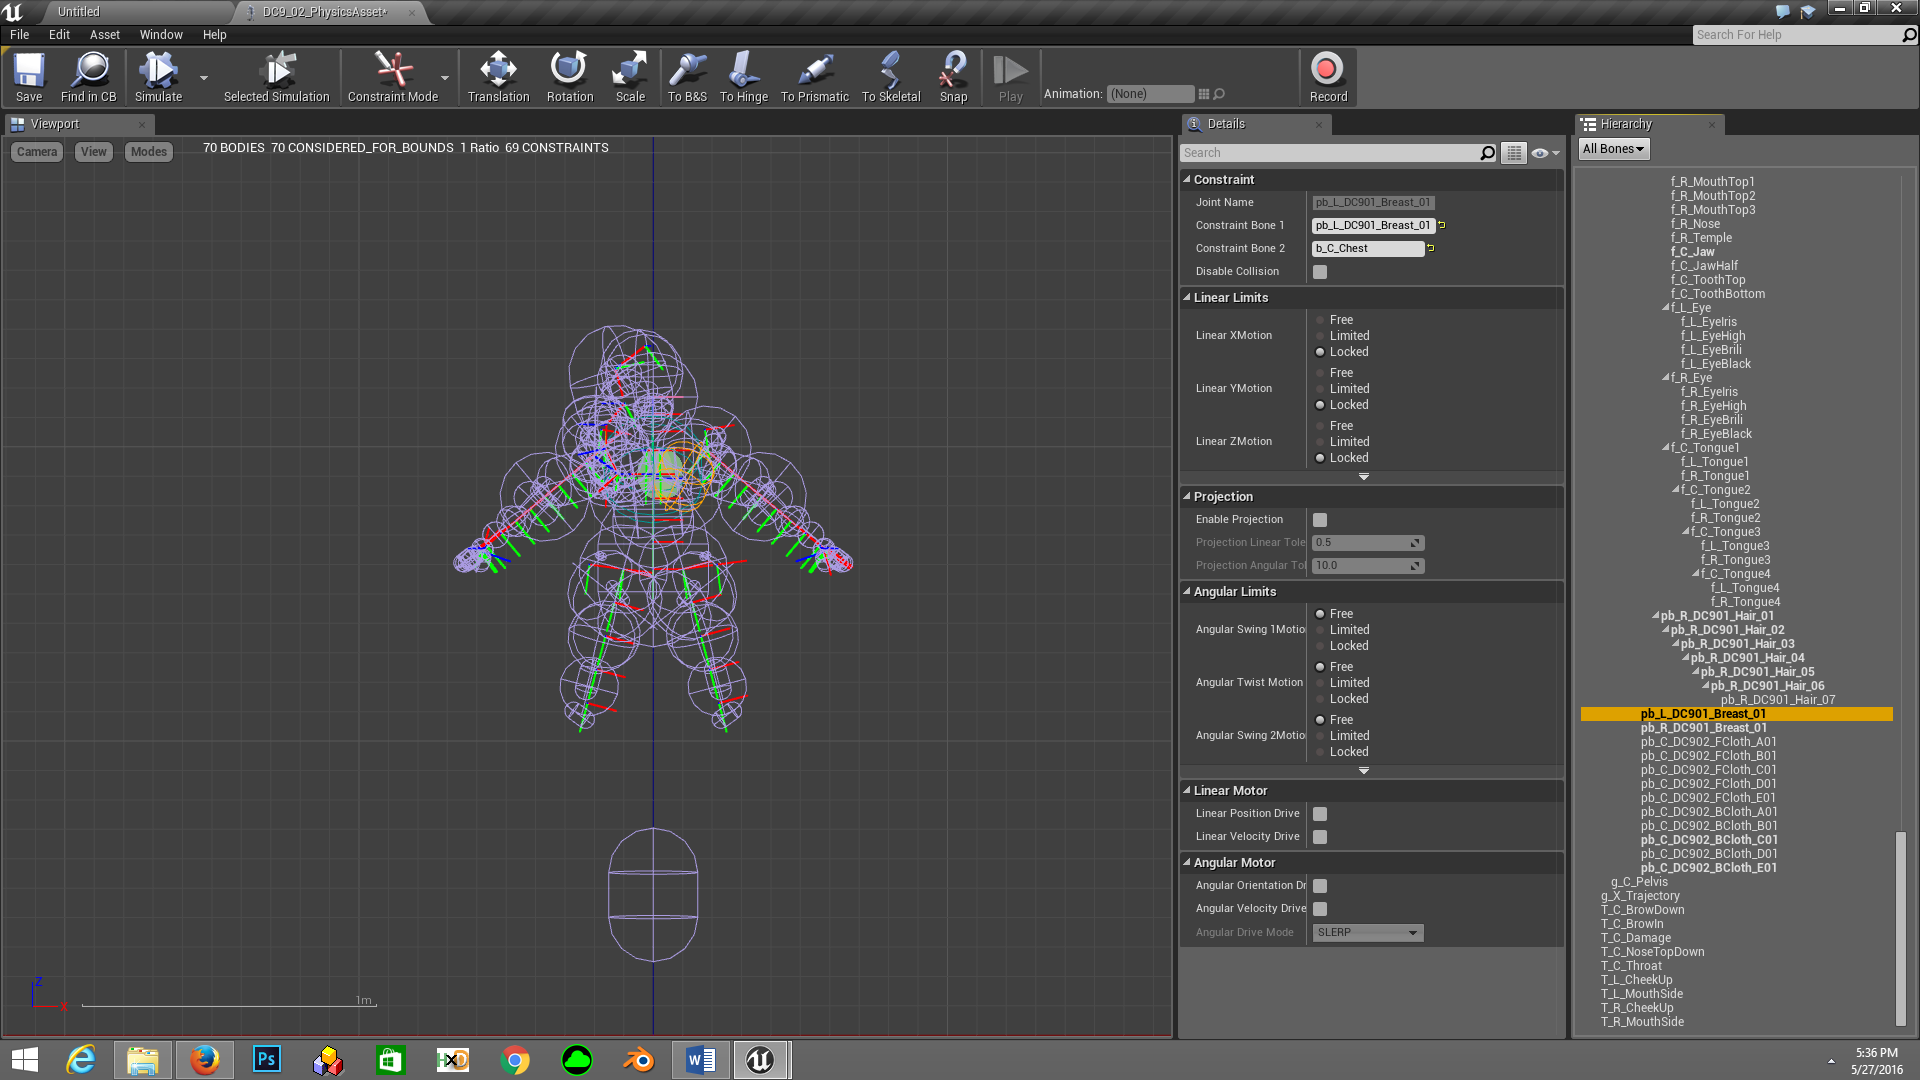
Constraint mode allows you to adjust physics bounds and other important properties while body mode allows you to add new physics bodies, change their type and add some forces that affect physics movement. Constraint mode is important because it will define the bounds in which any physics bone will move. Having bad constraints means bad or unrealistic movement.
Now first tick “Disable collision” checkbox which will disable collision between bones bound by a single constraint, in this case the breast and chest bones.

Leave “Linear Limits” as it is, so far I haven’t found any case that require linear limits to be unlocked.
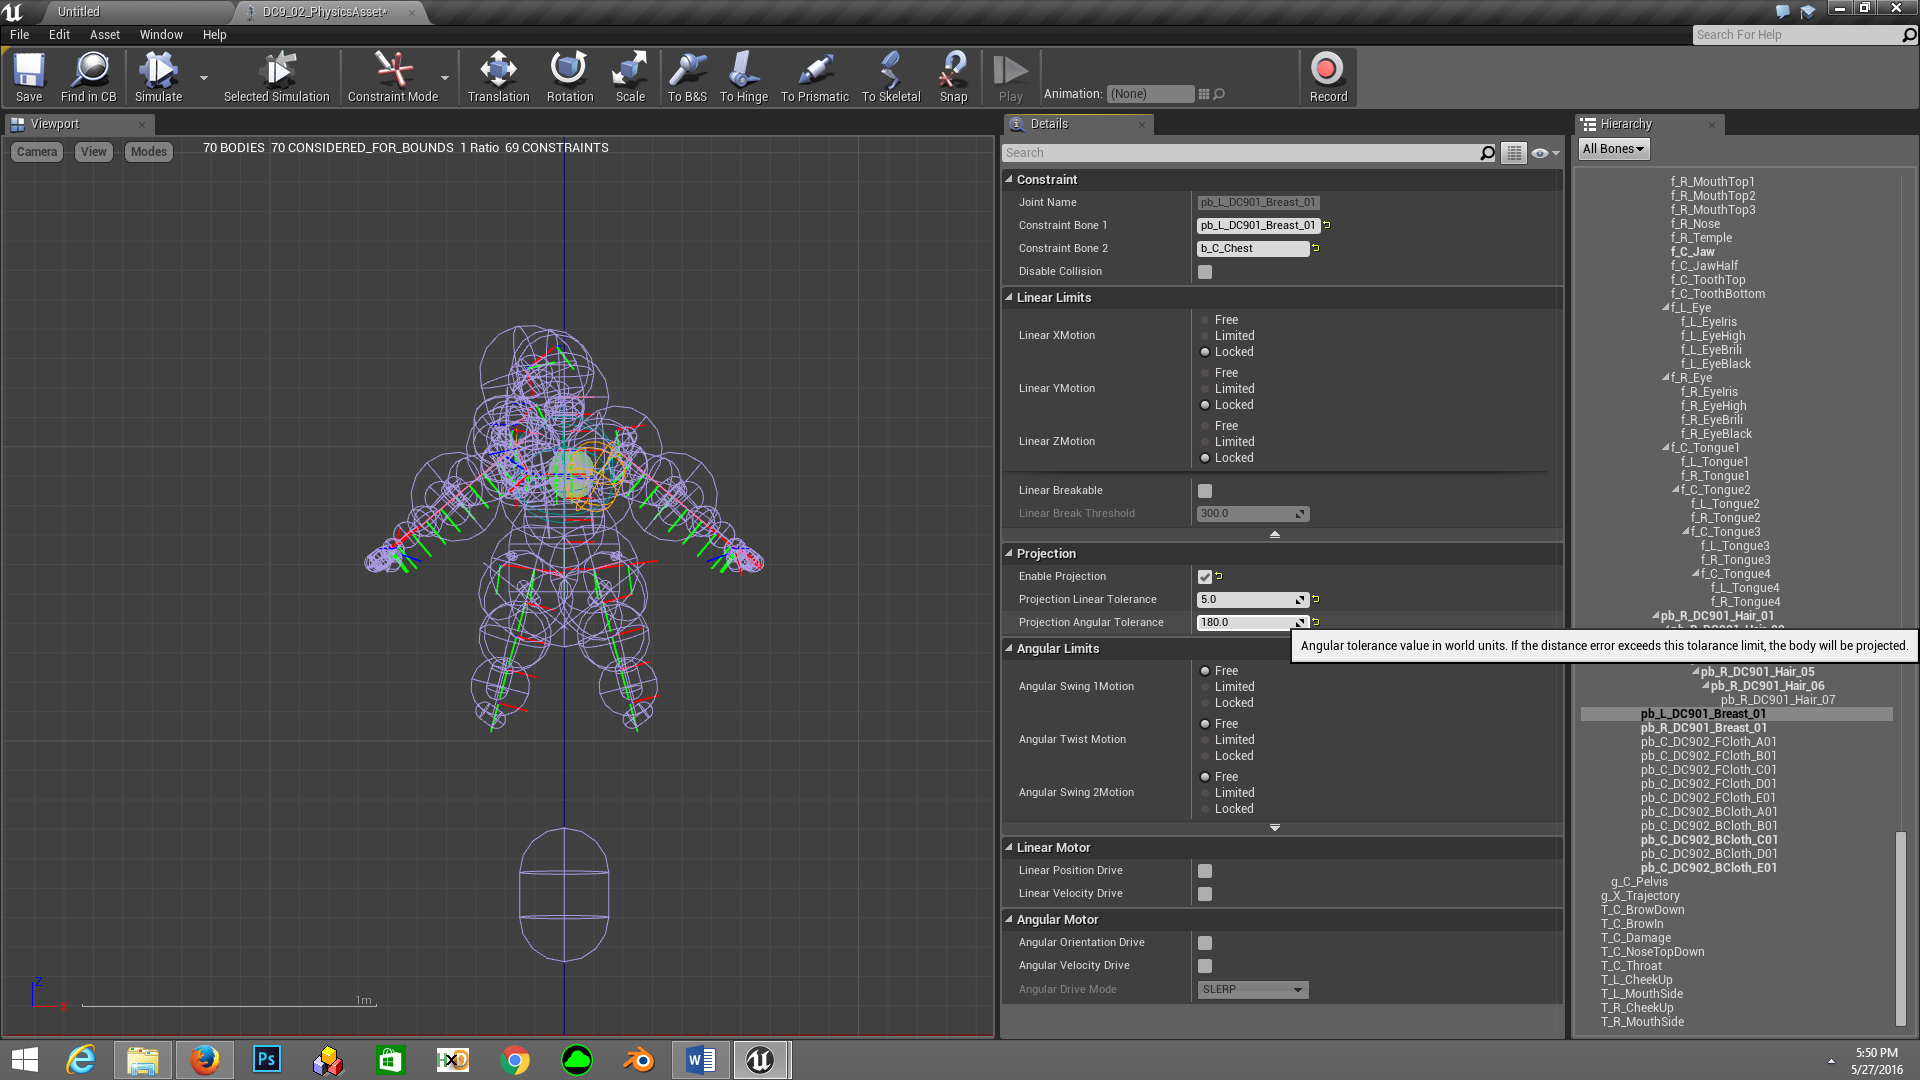
Now tick the projection checkbox, this is EXTREMELY important because projection define how to keep bones in control when they are moving too fast, for example a sudden fast movement (mostly critical arts in SFV) apply a lot of force on physics bones and due to this they appear to be flying everywhere causing artifacts and other weird issues. Projection will make sure that this doesn’t happen.
Projection Linear Tolerance and Projection Angular Tolerance control the real world values after which projection will take effect. In my case I picked 5 and 180 respectively, these work in most cases but pick the value you like (Requires experimentation in game).
Now in “Angular Limits” set all three limits to “Limited”. These are the three axes on which the bone will move, limited allows you to set these angle manually. In case of Laura, since she’s wearing a kind of loose clothing in her story outfit I found an angle of 3 degrees to be appropriate on all axes (Requires a lot experimentation in game).

You can also lock a single or multiple axis in case you don’t want the bone to move on those axis, this was particularly useful in Mika’s case where I locked her breast bones to move x axis because she’s wearing a tight clothing. In order to determine the axis correctly you need to click on translation button on top to see bone’s orientation as shown.
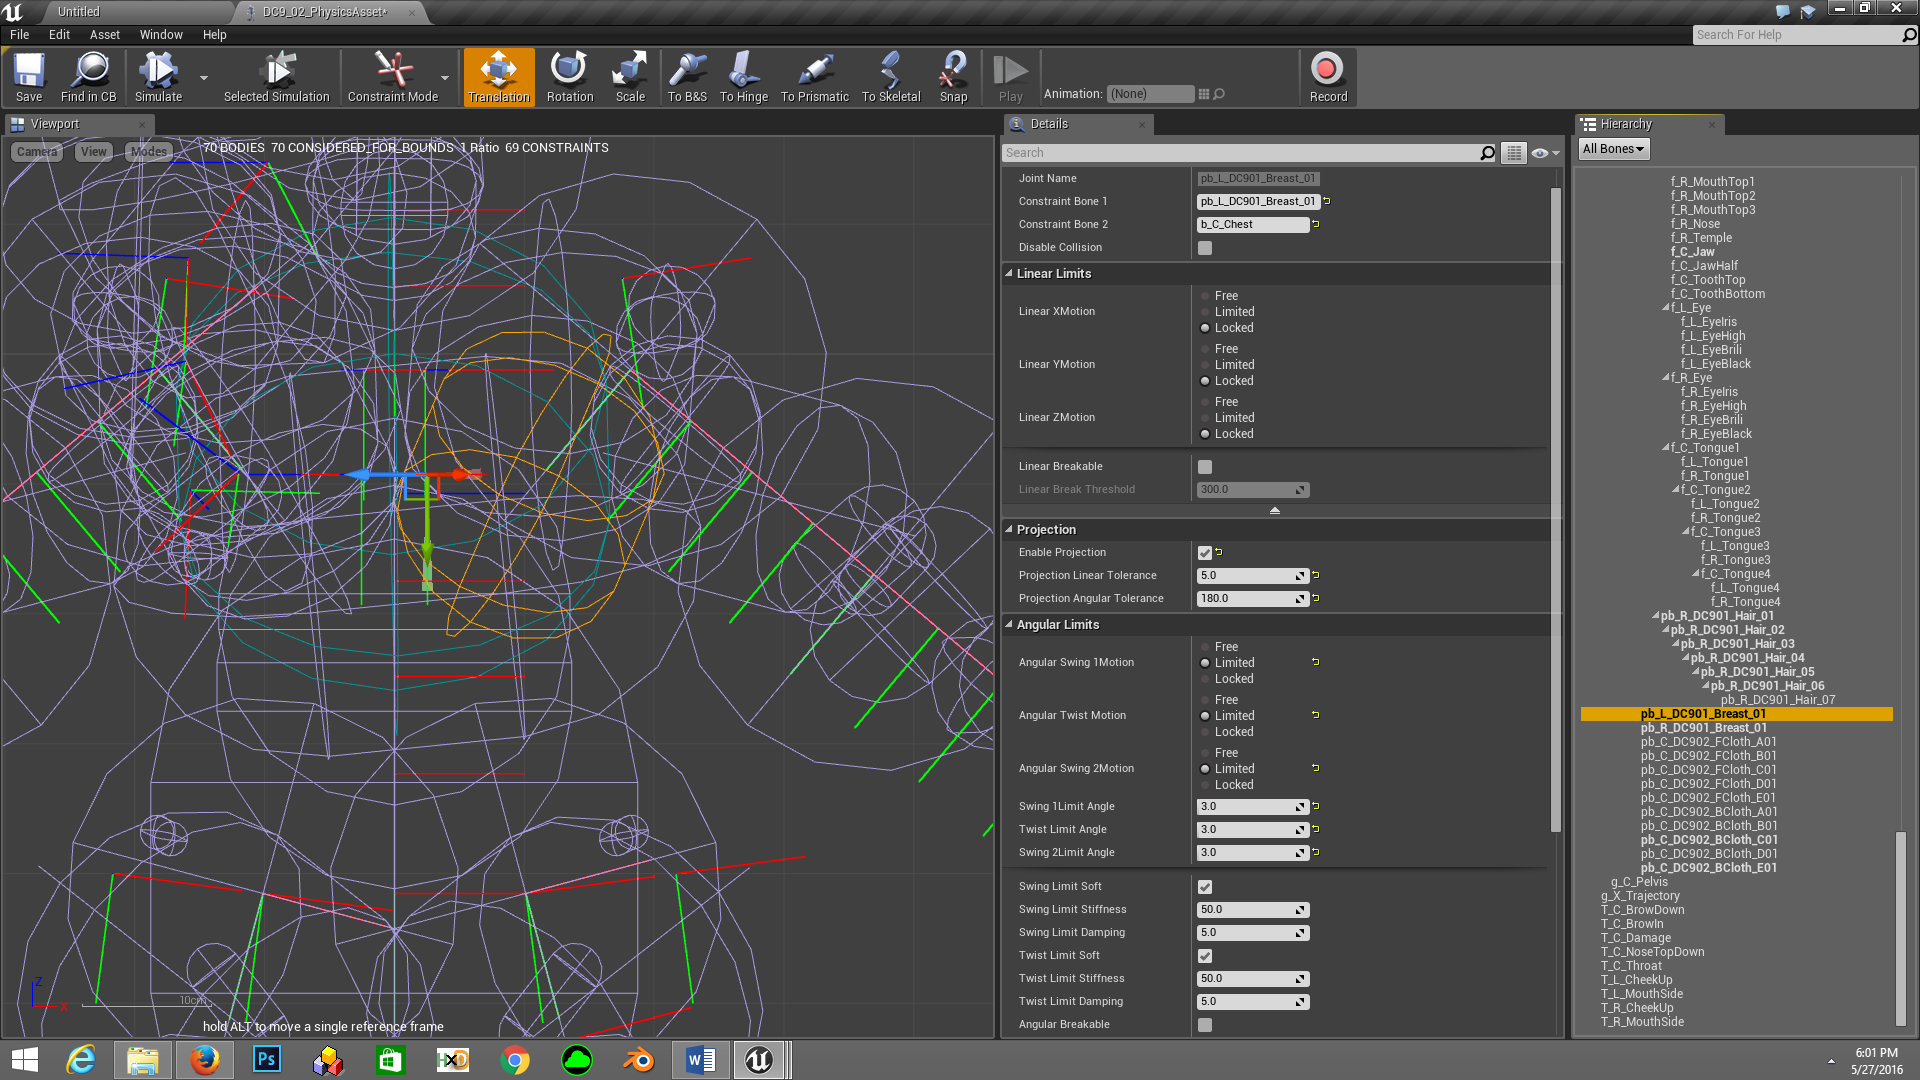
Now in soft limits set the tolerance values you prefer the most, once again this requires a lot of experimentation in game and there is no other way to find the right values for your particular need. In my case I set the values to be 500 for “Swing Limit Stiffness” and 50 for “Swing Limit Damping” for both Swing and Twist motions as shown.

“Swing Limit Stiffness” controls how stiff the constraint is making the body bounce back into its original position, setting this value higher will achieve a higher bounce effect though too high will make it look like a spring so choose a value that give you organic results.
“Swing Limit Damping” controls how much resistance is applied to the motion, making it slower, this is similar to what we set in STEP 2 (i.e. Linear and Angular Damping) however unlike those, this one starts to take effect when the body exceeds its motion limit or angle, reducing the momentum until it stops and bounce back into position.
Now with that done, repeat all the constraint parameters for other bone pb_R_DC901_Breast_01 then switch to body mode as shown.
Save your work then click on “Simulate” button to start simulation and see the results of your hard work.
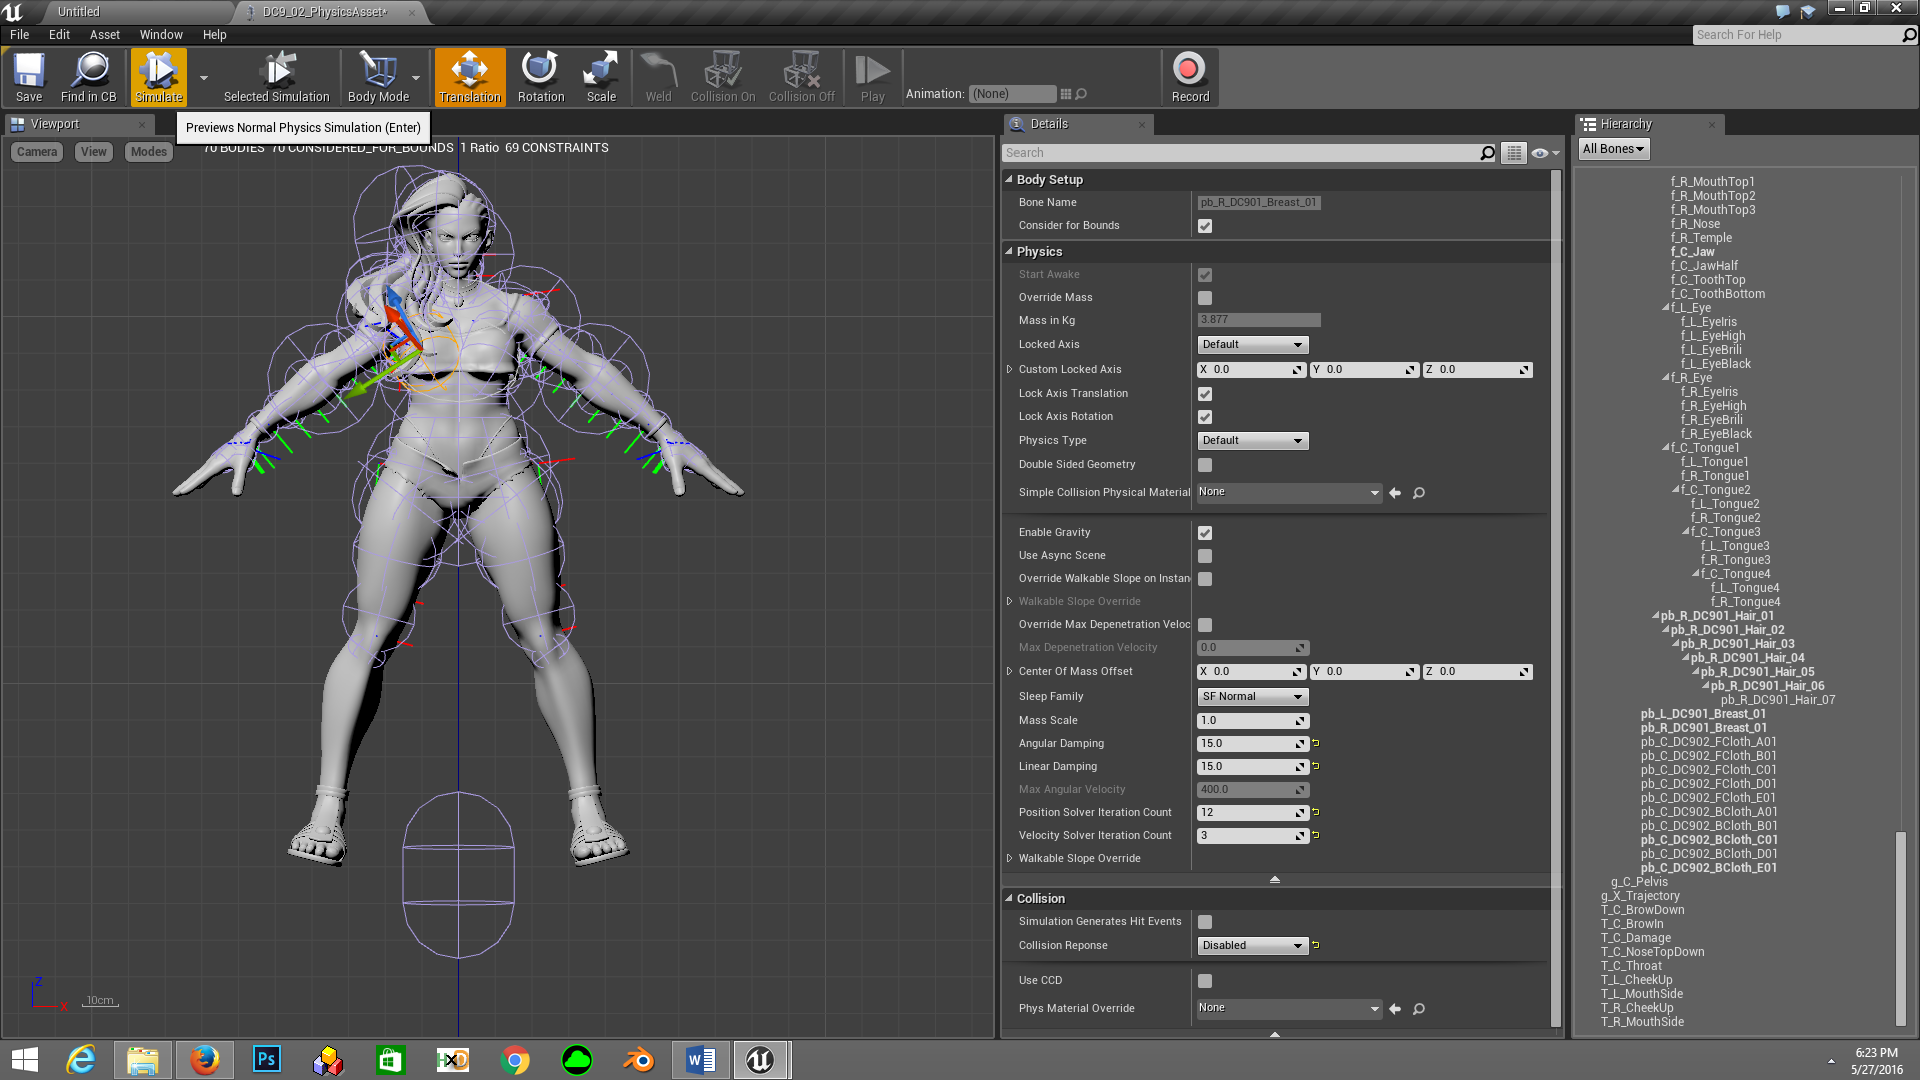
Press and hold control on your keyboard then click and hold right mouse button on any breast bone and try to drag it as shown.
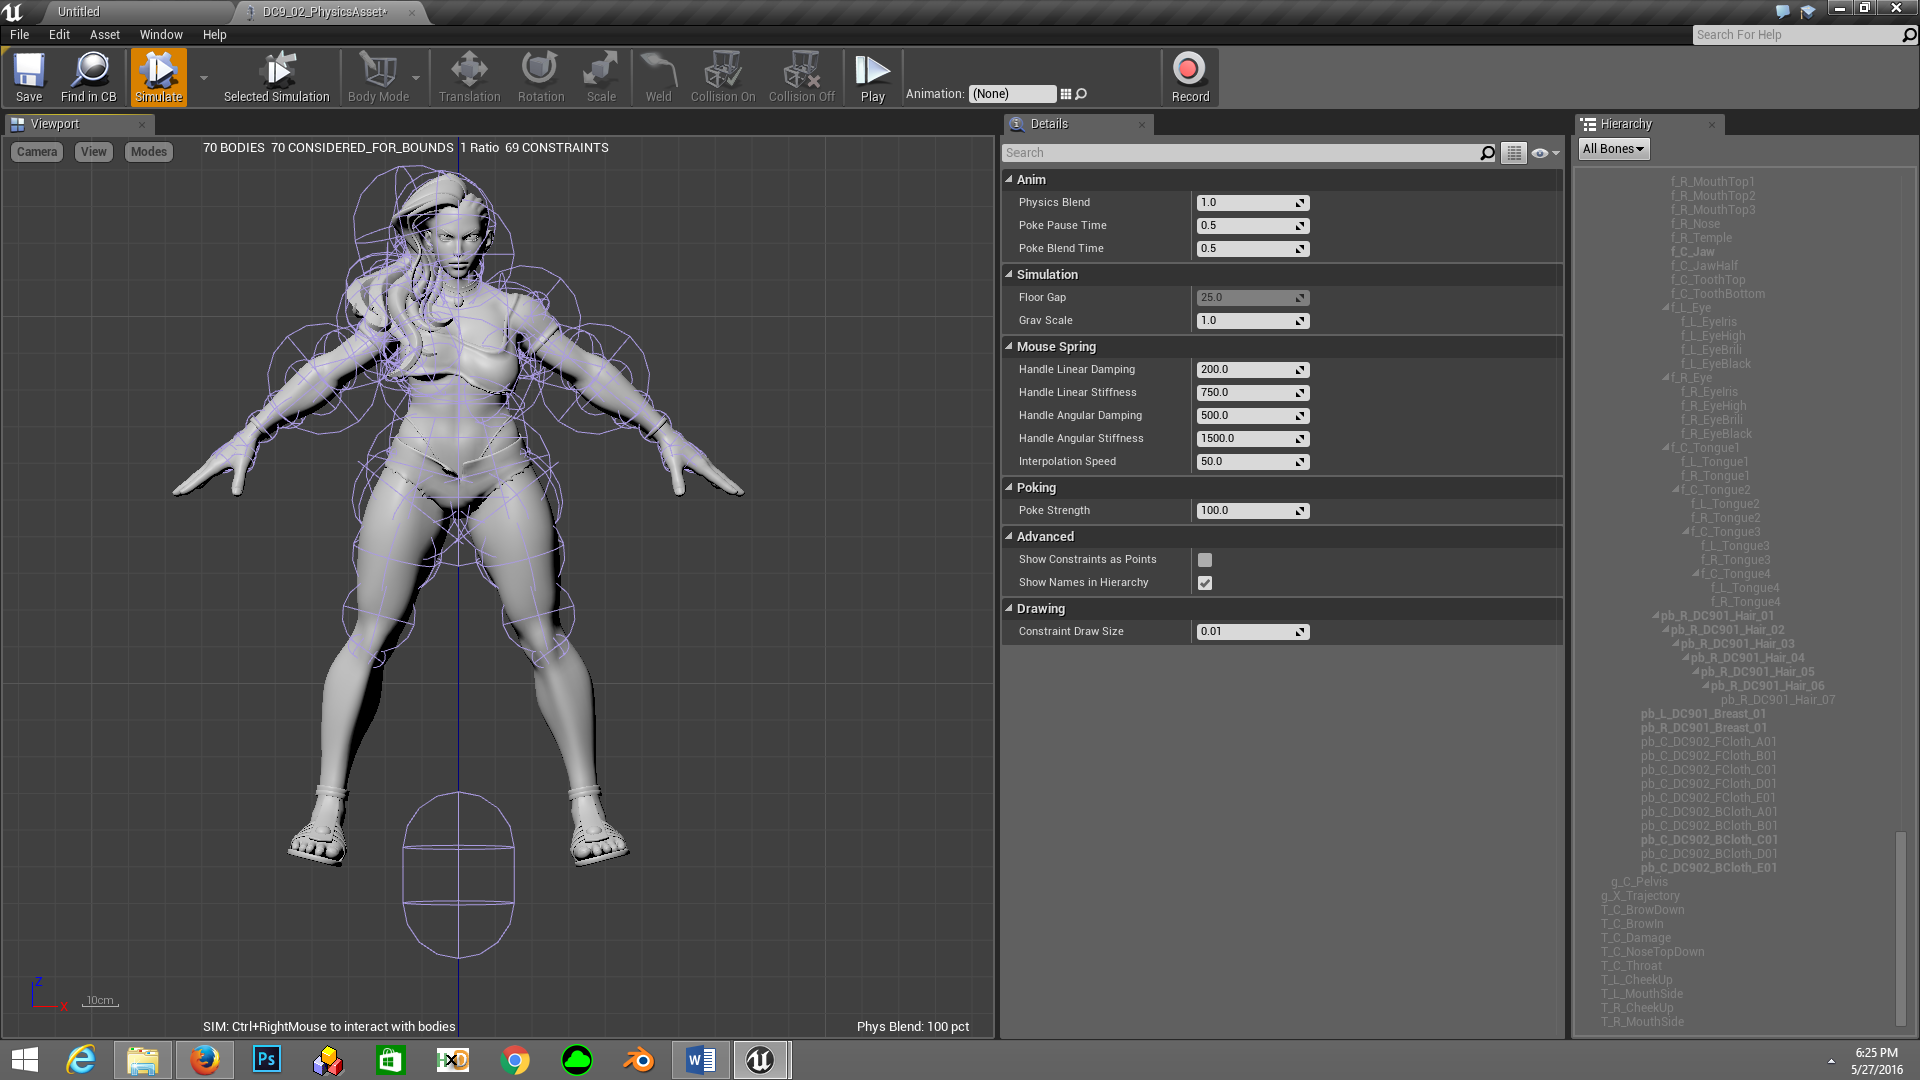
Leaving the mouse button will make the bone bounce back into its position and here you can see how the parameters you adjusted for damping, angle and motion limits are working. The simulation move is good for solving some big errors but it doesn’t give you a clear idea of how the physics will work in game because in game the character actually moves and a lot of external forces are applied on the bones so you need a lot of in game testing to get the results you want.
Now that breast physics are done, I would like to explain a couple of things about hairs. Hairs are also done in the similar way however some or all bones of hairs use “Collision Response” to actually collide with body bones, this controls how you solve the clipping issues. In most cases selecting the right bone in hair chain for collision will give you good results, you might also need more than one hair bone to have collision in order to solve clipping, this depends on the character you’re trying to mod and the type of hairs he/she has.
In most cases you will be controlling the axis on which hair bones move, their soft limits and damping. I cannot show you hair procedure in step by step way as it will make this already long tutorial two times longer and the procedure is same so help yourself and be patient for a lot of experiments.
ADDITIONAL TIPS
1. Select all hair bones from the right list and click on disable collision to disable inter bone collision which usually result in abrupt spring effects.

2. CCD (Continuous Collision Detection) tells the engine to detect collisions on continuously at the cost of CPU overhead. This also has subtle improvements so use it if you like.
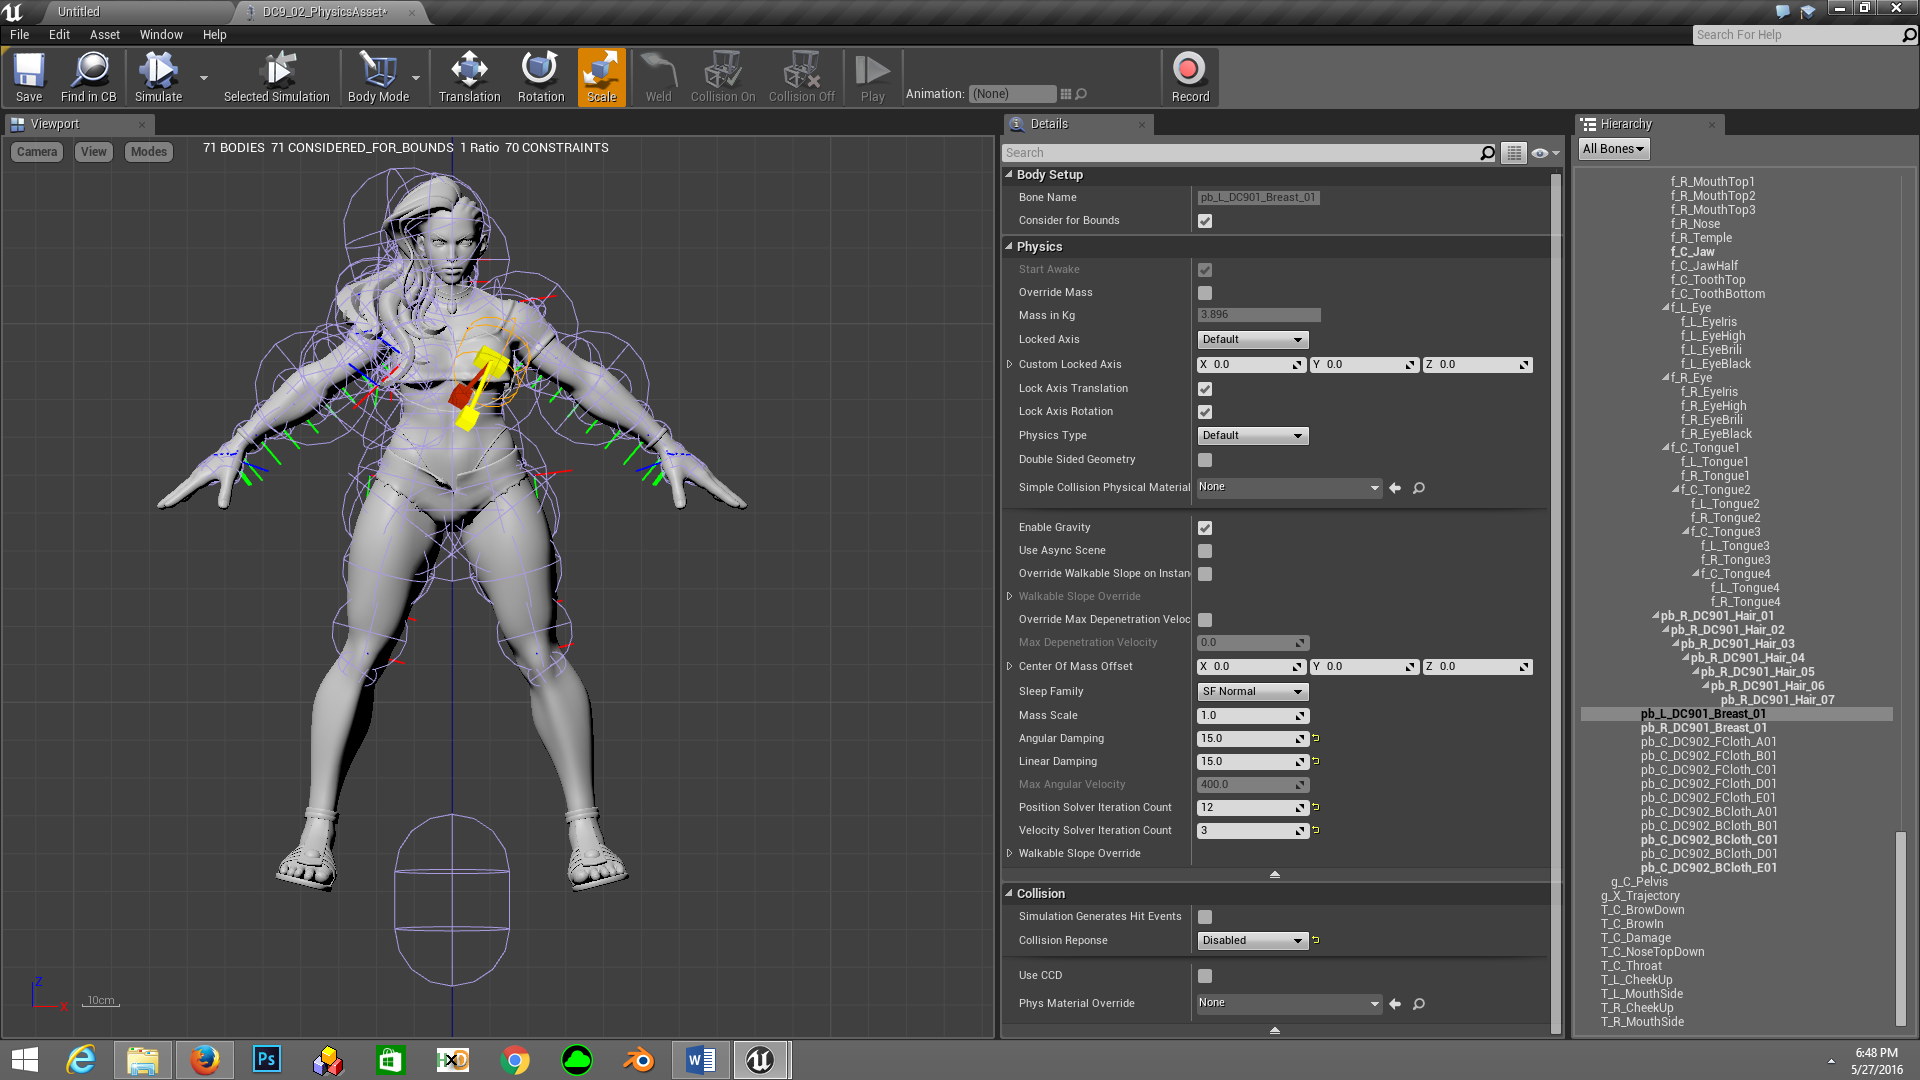
3. Bone orientation and size can be adjusted using the three buttons at top namely “Scale”, “Rotation” and “Translation”. You will need this in some cases when you find your collisions to be looking bad or incorrect.
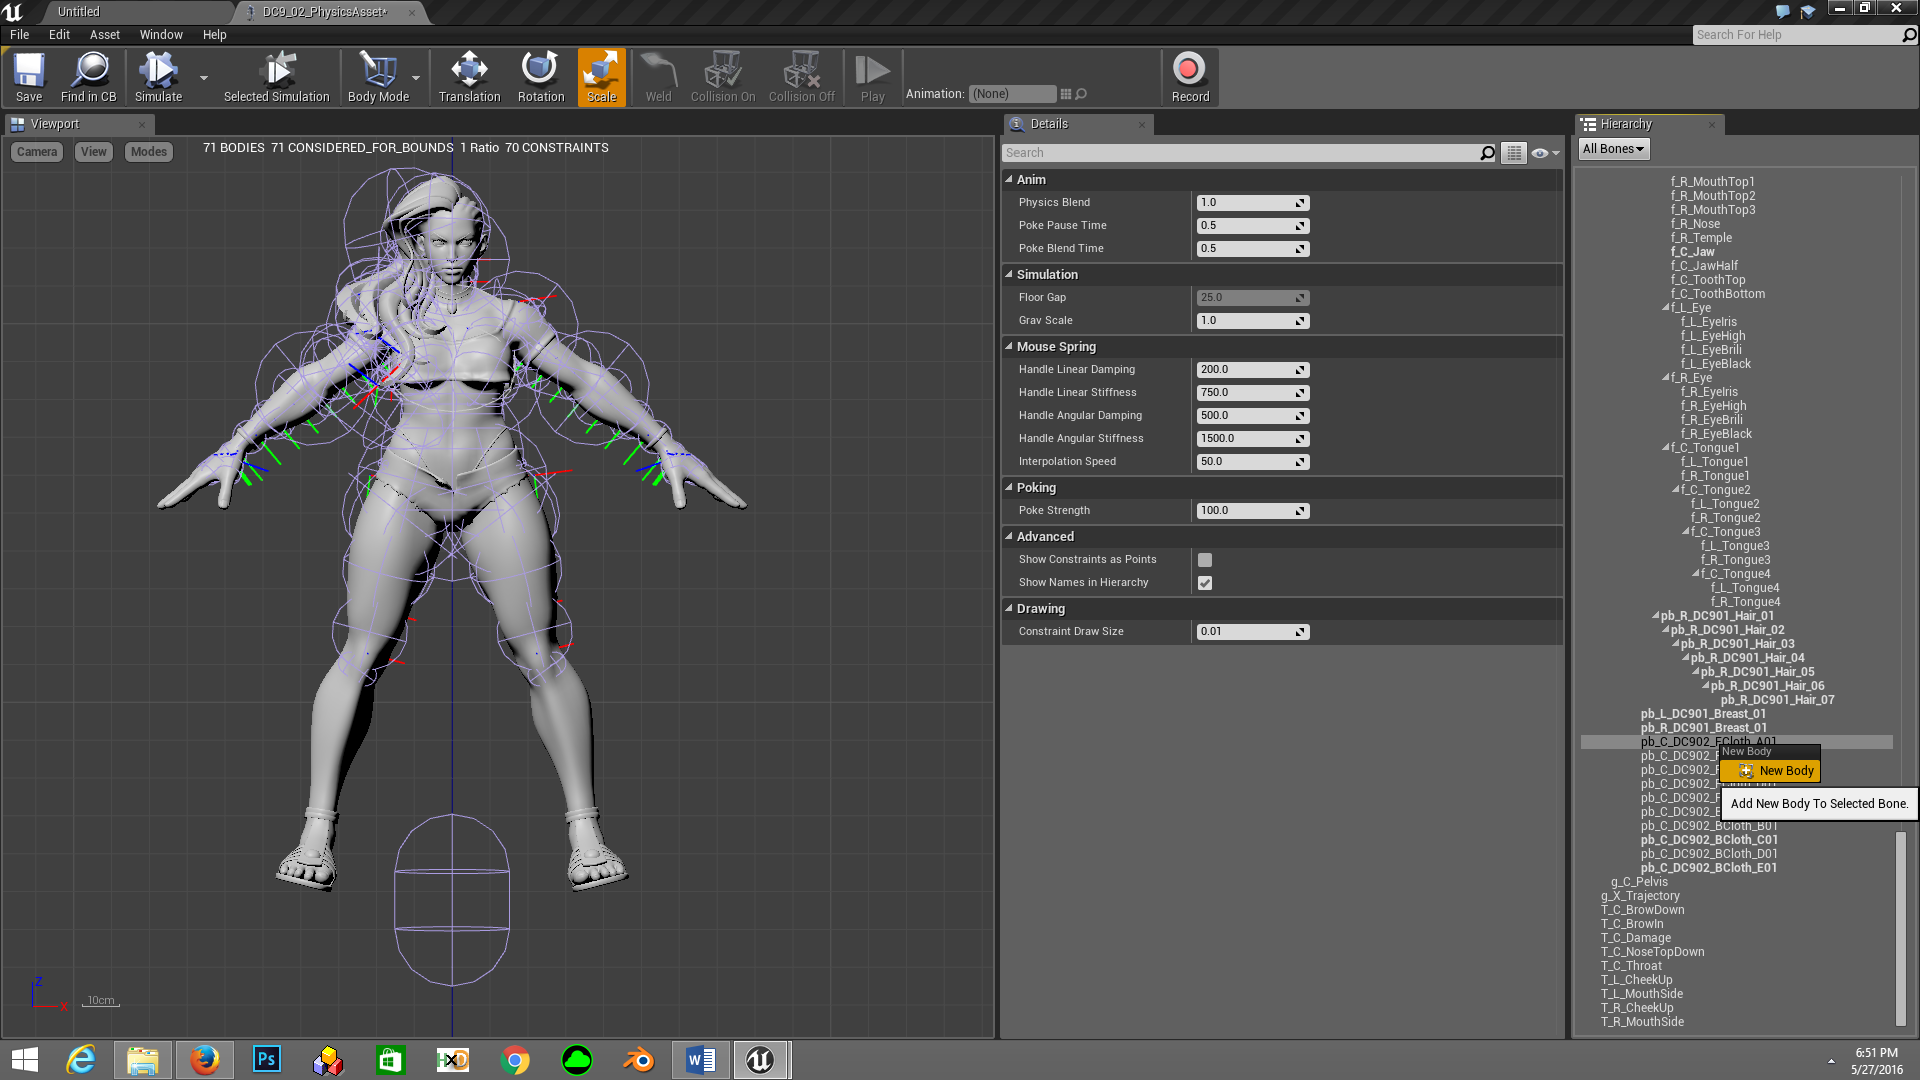
4. Not all bones require Sphyl (Capsule) shaped envelops, you can change the envelop type by selecting the bone name then hitting delete (if it already has existing envelop) then right clicking on its name and choosing new body.
This is the end of this tutorial and I hope it will help you but like I said before, this is only a starting point and something that will give you just the basics. I also made physics for other stuff like Laura's C1 belts and C2's shirt being little animated from loose parts and it's done in the same way as discussed in this tutorial.
If you learn something good or a way to improve this tutorial then do share it please.
I have been writing this tutorial from some days however after working on two different PhysicsAsset files I am not sure how much helpful it will be because from my experience working on physics is purely case per case experience, I thought that my experience with Laura’s physics will help me in Mika’s physics but it didn’t, I ended up having more bad attempts with Mika than Laura, particularly because of her hairs. In the end I made them pretty decent but it’s mostly a matter of try and fix then try again.
With that being said, this tutorial will help you understand the basic setup of PhysicsAsset file and how different parameters control different aspects of physics calculation. Again I cannot explain why I used a particular value (say 250) in a particular field because that purely depends on the results you want, however I can give you general description of that field.
REQUIREMENTS
1. Unreal Engine 4.6.7
2. General knowledge of SFV file structure and modding.
3. FBX file of the character you want to edit.
4. General knowledge of physics.
STEP 1
Create a new Unreal Project with basic folder structure of SFV for the character you want to mod then import the FBX file in the mesh folder as shown.
This will give you all the materials, character model, skeleton and a PhysicsAsset file. Move every files into their respective folders, basically we don’t need materials and character though we keep them for correct references.
STEP 2
Double click the PhysicsAsset file to open PhAT (Physics Asset Tool). This will give you character’s preview with its bone envelops as shown.
I don’t know how Unreal Engine understand which bone needs collision but I think it make some wrong assumptions so you can go ahead select and delete envelops you don’t need (area that doesn’t require any collision). Leaving envelops as it is don’t have any effect it just increase PhysicsAsset file size.
In this case I don’t think Laura’s story costume require any collision around the leg parts so I deleted some envelops here as shown.
Now select all bones from right list and choose physics type “kinematic” as shown. This will make every bone static having no physics calculation, we will now work on bones that require physics calculation.
STEP 3
From the list on right select a bone that requires physics. In my case I selected pb_L_DC901_Breast_01 as shown.
Now from the physics type drop down select “default” then in Physics pane adjust angular and linear damping. These add drag resistance to the movement making it slower and controlled, you might not need both but in my case I entered 15 for both. Experiment to get the results you want.
Position Solver Iteration and Velocity Solver Iteration can be used to increase physics calculation accuracy at the cost of CPU overhead, I found them giving subtle improvement to the physics but since we have good CPUs on PC increasing them is harmless so go ahead but don’t go crazy on them as I said they provide subtle or barely noticeable improvement. In my case I picked values 12 and 3 respectively (defaults are 8 and 1).
Now set collision response to “Disabled” because for breast bones we don’t need them to collide with anything else. After that select the other breast bone pb_R_DC901_Breast_01 and adjust same properties with same parameters.
STEP 4
At this point we’re ready to move to the constraint screen, currently we were working in body screen so we will switch to constraint screen as shown.
Constraint mode allows you to adjust physics bounds and other important properties while body mode allows you to add new physics bodies, change their type and add some forces that affect physics movement. Constraint mode is important because it will define the bounds in which any physics bone will move. Having bad constraints means bad or unrealistic movement.
Now first tick “Disable collision” checkbox which will disable collision between bones bound by a single constraint, in this case the breast and chest bones.
Leave “Linear Limits” as it is, so far I haven’t found any case that require linear limits to be unlocked.
Now tick the projection checkbox, this is EXTREMELY important because projection define how to keep bones in control when they are moving too fast, for example a sudden fast movement (mostly critical arts in SFV) apply a lot of force on physics bones and due to this they appear to be flying everywhere causing artifacts and other weird issues. Projection will make sure that this doesn’t happen.
Projection Linear Tolerance and Projection Angular Tolerance control the real world values after which projection will take effect. In my case I picked 5 and 180 respectively, these work in most cases but pick the value you like (Requires experimentation in game).
Now in “Angular Limits” set all three limits to “Limited”. These are the three axes on which the bone will move, limited allows you to set these angle manually. In case of Laura, since she’s wearing a kind of loose clothing in her story outfit I found an angle of 3 degrees to be appropriate on all axes (Requires a lot experimentation in game).
You can also lock a single or multiple axis in case you don’t want the bone to move on those axis, this was particularly useful in Mika’s case where I locked her breast bones to move x axis because she’s wearing a tight clothing. In order to determine the axis correctly you need to click on translation button on top to see bone’s orientation as shown.
Now in soft limits set the tolerance values you prefer the most, once again this requires a lot of experimentation in game and there is no other way to find the right values for your particular need. In my case I set the values to be 500 for “Swing Limit Stiffness” and 50 for “Swing Limit Damping” for both Swing and Twist motions as shown.
“Swing Limit Stiffness” controls how stiff the constraint is making the body bounce back into its original position, setting this value higher will achieve a higher bounce effect though too high will make it look like a spring so choose a value that give you organic results.
“Swing Limit Damping” controls how much resistance is applied to the motion, making it slower, this is similar to what we set in STEP 2 (i.e. Linear and Angular Damping) however unlike those, this one starts to take effect when the body exceeds its motion limit or angle, reducing the momentum until it stops and bounce back into position.
Now with that done, repeat all the constraint parameters for other bone pb_R_DC901_Breast_01 then switch to body mode as shown.
Save your work then click on “Simulate” button to start simulation and see the results of your hard work.
Press and hold control on your keyboard then click and hold right mouse button on any breast bone and try to drag it as shown.
Leaving the mouse button will make the bone bounce back into its position and here you can see how the parameters you adjusted for damping, angle and motion limits are working. The simulation move is good for solving some big errors but it doesn’t give you a clear idea of how the physics will work in game because in game the character actually moves and a lot of external forces are applied on the bones so you need a lot of in game testing to get the results you want.
Now that breast physics are done, I would like to explain a couple of things about hairs. Hairs are also done in the similar way however some or all bones of hairs use “Collision Response” to actually collide with body bones, this controls how you solve the clipping issues. In most cases selecting the right bone in hair chain for collision will give you good results, you might also need more than one hair bone to have collision in order to solve clipping, this depends on the character you’re trying to mod and the type of hairs he/she has.
In most cases you will be controlling the axis on which hair bones move, their soft limits and damping. I cannot show you hair procedure in step by step way as it will make this already long tutorial two times longer and the procedure is same so help yourself and be patient for a lot of experiments.
ADDITIONAL TIPS
1. Select all hair bones from the right list and click on disable collision to disable inter bone collision which usually result in abrupt spring effects.
2. CCD (Continuous Collision Detection) tells the engine to detect collisions on continuously at the cost of CPU overhead. This also has subtle improvements so use it if you like.
3. Bone orientation and size can be adjusted using the three buttons at top namely “Scale”, “Rotation” and “Translation”. You will need this in some cases when you find your collisions to be looking bad or incorrect.
4. Not all bones require Sphyl (Capsule) shaped envelops, you can change the envelop type by selecting the bone name then hitting delete (if it already has existing envelop) then right clicking on its name and choosing new body.
This is the end of this tutorial and I hope it will help you but like I said before, this is only a starting point and something that will give you just the basics. I also made physics for other stuff like Laura's C1 belts and C2's shirt being little animated from loose parts and it's done in the same way as discussed in this tutorial.
If you learn something good or a way to improve this tutorial then do share it please.